Connect with us

Beauty Tips

Makeup in the 60’s: A Retro Beauty Trend

Published

on

makeup in the 60's

Here is your complete guide to Makeup in the 60’s

Introduction to Makeup in the 60’s

The world of fashion and beauty is ever-evolving, with trends coming and going. However, some looks remain timeless and continue to inspire makeup enthusiasts even decades after their inception. One such era that left a lasting mark on the beauty industry is the 60’s, known for its iconic makeup trends and beauty icons. In this article, we will take a trip down memory lane and explore the makeup trends that defined the swinging 60’s, how to recreate these looks with modern products, and how you can incorporate retro makeup elements into your own beauty routine for a touch of vintage glam.

Historical Context

The Swinging 60’s The 60’s were a revolutionary era marked by significant cultural and social changes that had a profound impact on fashion and beauty. The youth rebellion, women’s liberation movement, and the rise of pop culture icons all contributed to the unique makeup trends of the time.

One of the most iconic makeup looks of the 60’s was the “Twiggy” look, named after the famous British model Twiggy, who was known for her doe-eyed appearance with long lashes and bold eyeliner. The “Mod” look, characterized by colorful eyeshadows, graphic eyeliners, and pale lips, was also a prominent trend of the era. Beauty icons like Audrey Hepburn, Brigitte Bardot, and Marilyn Monroe influenced the makeup trends of the 60’s with their signature looks, leaving a lasting impact on the beauty world.

Makeup Products and Techniques of the 60’s

The makeup products and techniques of the 60’s were different from those of today, but they laid the foundation for modern makeup trends. Popular makeup products of the era included creamy foundations, powder blushes, and lipsticks in shades of pink, coral, and nude.

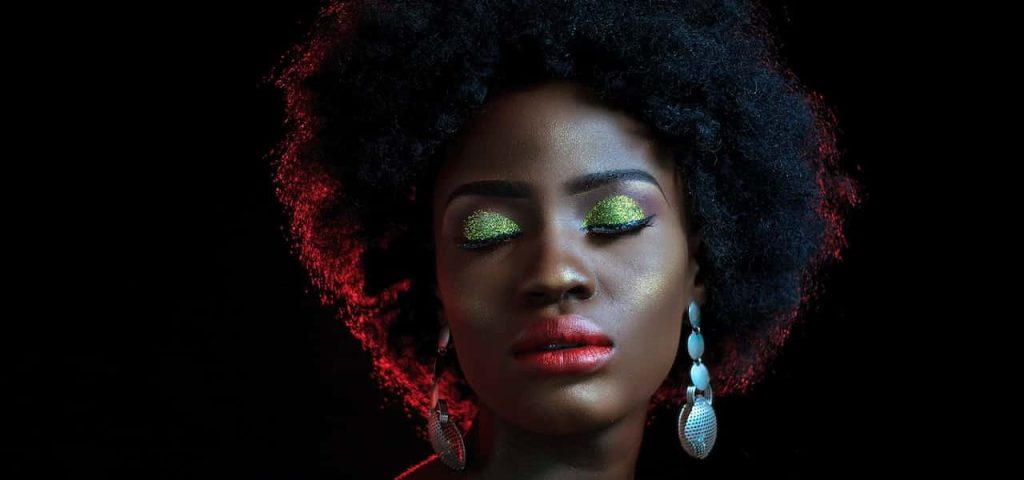
Eye makeup was a focal point, with bold winged eyeliners, false eyelashes, and pastel or shimmery eyeshadows being popular choices. To recreate the iconic “Twiggy” look, you would need to apply several coats of mascara to achieve long, spiky lashes, and draw thick black eyeliner on the upper lash line extending towards the temples.

The “Mod” look often featured bright and bold eyeshadow colors, such as blues, greens, and pinks, applied to the lids and creases with a defined crease line. Lips were kept pale with nude or light pink shades, and cheeks were lightly blushed for a natural flush.

Recreating 60’s Makeup Looks with Modern Products

While the makeup products of the 60’s may have evolved, you can still recreate the retro looks with modern products. For the “Twiggy” look, you can use a lengthening mascara and a waterproof liquid eyeliner to achieve the iconic lashes and bold eyeliner.

False lashes or lash extensions can also be used to add extra drama. For the “Mod” look, you can use bright and bold eyeshadow palettes to create colorful eye looks, and a liquid eyeliner with a fine tip to draw precise lines. Nude or light pink lipsticks and blushes can be easily found in modern makeup collections to complete the vintage look. Experimenting with different textures and finishes of makeup products can help you achieve a modern interpretation of the 60’s makeup trends while still maintaining the essence of the era.

Popular Makeup Trends of the 60’s

The 60’s were known for several iconic makeup trends that are still revered today. The “Twiggy” look, as mentioned earlier, with its emphasis on long lashes and bold eyeliner, was a groundbreaking trend that transformed the traditional makeup aesthetic of the time. The “Mod” look, characterized by bright and bold eyeshadows, graphic eyeliners, and pale lips, was a rebellion against the traditional beauty norms and embraced a more daring and experimental approach to makeup.

makeup in the 60's

Another popular trend of the 60’s was the “Baby Doll” look, popularized by actress Brigitte Bardot, which featured heavy black eyeliner on the upper and lower lash lines, paired with a nude or pale pink lip, and a hint of blush on the cheeks for a youthful and innocent look. The 60’s also saw the rise of the “natural” makeup trend, popularized by icons like Audrey Hepburn, which emphasized flawless skin, minimal makeup, and a fresh-faced glow. This trend focused on enhancing one’s natural features rather than creating dramatic looks, and it continues to be a timeless beauty trend that is widely followed today.

Incorporating Retro Makeup into Your Beauty Routine

You don’t have to be stuck in the past to embrace the retro beauty of the 60’s. Incorporating elements of this iconic era into your modern beauty routine can add a touch of vintage glam and make a bold fashion statement. Here are some tips to help you incorporate retro makeup into your beauty routine:

  1. Embrace the Winged Eyeliner: The bold winged eyeliner was a defining element of the 60’s makeup looks. Experiment with different styles of winged eyeliner, from subtle flicks to bold cat-eyes, to find a look that suits your eye shape and personal style.
  2. Play with Colors: The 60’s were all about experimenting with bold and vibrant eyeshadow colors. Don’t be afraid to play with bright blues, greens, pinks, and purples to create fun and eye-catching looks. You can also incorporate pastel shades for a softer and more romantic vibe.
  3. Focus on the Lashes: Long and voluminous lashes were a staple of the 60’s makeup looks. Invest in a good quality mascara that lengthens and volumizes your lashes or try false lashes or lash extensions for added drama.
  4. Go for Nude or Pale Lips: Nude or pale pink lips were a popular choice in the 60’s makeup looks. Opt for lipsticks or glosses in these shades to complete your retro-inspired look. You can also experiment with other classic lipstick shades like reds or corals for a more daring and glamorous look.
  5. Keep the Skin Flawless: Flawless skin was a key element of the natural makeup trend of the 60’s. Invest in a good skincare routine to achieve clear and healthy skin. Use a lightweight foundation or tinted moisturizer to create a natural-looking base, and add a touch of blush to the cheeks for a fresh-faced glow.

FAQs

What kind of makeup was popular in the 1960s?

During the 1960s, makeup trends were bold and daring, with a focus on dramatic eyes, bright colors, and flawless skin. The iconic “Twiggy” look, featuring heavy eyelashes, graphic eyeliners, and pale lips, was a popular trend. Other popular makeup styles included the “Baby Doll” look, characterized by heavy black eyeliner and nude or pale pink lips, and the natural makeup trend, popularized by icons like Audrey Hepburn, which emphasized minimal makeup and fresh-faced glow.

Read More About The Best Sign Matches for Every Sun Sign.

What influenced makeup in the 60s?

The makeup trends of the 60s were heavily influenced by the social and cultural changes of the era. The feminist movement, civil rights movement, and the rise of youth culture had a significant impact on beauty standards and makeup trends.

Pop culture icons like Twiggy, Brigitte Bardot, and Audrey Hepburn also influenced the makeup looks of the 60s with their bold and daring styles. Additionally, advancements in technology and mass media, such as television and magazines, played a role in popularizing certain makeup trends of the time.

Read More About 10 Health Benefits of Cycling Every Day You Need to Know.

How do you make your makeup look 60s?

If you want to recreate the iconic makeup looks of the 60s, here are some tips:

  1. Winged Eyeliner: Embrace bold winged eyeliner, either subtle flicks or dramatic cat-eyes, using a liquid or gel eyeliner.
  2. Bright Eyeshadows: Experiment with bold and vibrant eyeshadow colors like blues, greens, pinks, and purples, and apply them on the eyelids and lower lash line for a pop of color.
  3. Dramatic Lashes: Achieve long and voluminous lashes using a good quality mascara, false lashes, or lash extensions to create a statement-making look.
  4. Nude or Pale Lips: Opt for nude or pale pink lipsticks or glosses to achieve the popular lip color of the 60s. You can also experiment with other classic lipstick shades like reds or corals for a more daring look.
  5. Flawless Skin: Focus on achieving clear and flawless skin using a lightweight foundation or tinted moisturizer, and add a touch of blush on the cheeks for a natural-looking, fresh-faced glow.

What kind of makeup did hippies wear in the 60s?

Hippies in the 60s embraced a more natural and bohemian style, including their makeup. They often opted for a minimal and earthy makeup look that reflected their anti-establishment and free-spirited ideals. This included using natural and organic products, avoiding heavy makeup, and embracing a “no-makeup” makeup look.

Read More About Powerlifting Weight Classes for Women: Everything You Need to Know.

Hippies typically emphasized their natural features, such as glowing skin, freckles, and a sun-kissed complexion. They also used earth-toned eyeshadows, like browns and oranges, and often skipped mascara or used clear or brown mascara for a more natural look.

Lips were usually kept neutral with nude or earthy shades, and some hippies even used natural pigments like beet juice or crushed flower petals for a pop of color on their cheeks and lips. Overall, the makeup worn by hippies in the 60s was minimal, natural, and in harmony with their counter-cultural beliefs.

Read More About The Best Sign Matches for Every Sun Sign.

Conclusion

The makeup trends of the 60’s continue to inspire and influence the beauty industry today. From the iconic “Twiggy” look to the daring “Mod” trend, the retro beauty of the 60’s is timeless and can be easily incorporated into your modern beauty routine. Experiment with different makeup products and techniques to recreate the vintage looks with a modern twist, and embrace the bold and daring spirit of the 60’s.

Read More About The Surprising Benefits of Sleeping on the Floor.

Whether you opt for winged eyeliner, colorful eyeshadows, or nude lips, incorporating retro makeup elements into your beauty routine can make a statement and add a touch of nostalgia to your overall look. So, go ahead and embrace the beauty trends of the 60’s for a timeless and glamorous makeup look that never goes out of style!

Read More About Home Remedies to Remove Acrylic Nails.

Beauty Tips

What Massage Oils Are Best: Rejuvenate Your Skin with Hydration

Published

on

what massage oils are best

Here is your complete guide to what massage oils are best

Introduction to What Massage Oils Are Best

In the world of massage therapy, the choice of massage oils plays a crucial role in enhancing the overall experience for both the giver and the receiver. Selecting the right massage oil can elevate relaxation, promote skin health, and provide various therapeutic benefits. In this article, we will delve into the top 10 best massage oils, their unique properties, benefits, and how to choose the perfect one for your needs.

When it comes to indulging in a soothing massage, the type of massage oil used can make a significant difference in the overall experience. Massage oils are not only lubricants but also carriers for essential oils, providing nourishment to the skin and aiding in relaxation. Understanding the qualities of different massage oils is essential for creating a personalized and effective massage experience.

Factors to Consider When Choosing

  • Skin Type and Sensitivities: Opt for oils that match your skin’s needs and won’t cause irritation.
  • Desired Massage Techniques: Consider the viscosity and glide required for the massage style you prefer.
  • Aromatherapy Preferences: Choose oils with scents that complement the desired mood or therapeutic effect.
  • Shelf Life and Storage: Pay attention to the oil’s stability and storage requirements to maintain its quality.

How to Use Massage Oils: A Step-by-Step Guide

Massage oils play a crucial role in the massage experience, providing benefits such as lubrication, nourishment, and aromatherapy. To make the most of your massage, follow this step-by-step guide on how to use massage oils effectively.

Step 1: Choose the Right Massage Oil

Selecting the right massage oil depends on your preferences and desired benefits. Some popular options include:

  • Almond oil: Widely used, nourishing, and has a mild scent.
  • Grapeseed oil: Easily absorbed, light, and moisturizing.
  • Sunflower oil: Affordable, spreads easily, and has a short shelf life.
  • Jojoba oil: Great for all skin types, absorbs well, and has a long shelf life.
  • Coconut oil: Solid at room temperature, has a strong scent, and is highly moisturizing.

Step 2: Dilute Essential Oils (Optional)

If you want to add essential oils for aromatherapy benefits, remember to dilute them in your chosen carrier oil. A general rule is to use 15-30 drops of essential oil per ¼ cup of carrier oil. Some popular essential oils for massage include:

  • Lavender: Calming, relaxing, and promotes better sleep.
  • Peppermint: Cooling, soothing, and can help relieve sore muscles.
  • Rosemary: Invigorating, tingling, and can help improve focus.
  • Ylang-ylang: Passionate, romantic, and can help reduce stress.

Step 3: Warm the Oil

Warming the oil before use can enhance the massage experience by creating a comforting sensation. To warm the oil, place the bottle in a bowl of hot water for a few minutes or rub the oil between your hands before applying it to the skin.

Step 4: Apply the Oil

When applying the oil, use long, smooth strokes to cover the area being massaged. This will help reduce friction and ensure a comfortable experience for both the giver and receiver.

Step 5: Massage Techniques

Use various massage techniques such as kneading, rolling, and circular motions to target different muscle groups and provide relief. Be mindful of pressure and always communicate with the recipient to ensure a comfortable and enjoyable experience.

Step 6: Clean Up

After the massage, clean the area and any tools used with soap and warm water. Remember to store your massage oils in a cool, dry place to maintain their quality and longevity.By following these steps, you can create a relaxing and beneficial massage experience using the right massage oils and techniques.

Top 10 Best Massage Oils

1. Coconut Oil

  • Benefits: Hydrating, antimicrobial
  • Skin Type Suitability: All skin types
  • Shelf Life: 2 years

2. Almond Oil

  • Benefits: Nourishing, anti-inflammatory
  • Skin Type Suitability: Sensitive skin
  • Shelf Life: 1 year

3. Jojoba Oil

  • Benefits: Moisturizing, non-comedogenic
  • Skin Type Suitability: Oily, acne-prone
  • Shelf Life: Indefinite

4. Olive Oil

  • Benefits: Rich in antioxidants, moisturizing
  • Skin Type Suitability: Dry skin
  • Shelf Life: 2 years

5. Argan Oil

  • Benefits: Anti-aging, hydrating
  • Skin Type Suitability: All skin types
  • Shelf Life: 2 years

6. Grapeseed Oil

  • Benefits: Lightweight, non-greasy
  • Skin Type Suitability: Acne-prone skin
  • Shelf Life: 6 months

7. Avocado Oil

  • Benefits: Deeply moisturizing, anti-inflammatory
  • Skin Type Suitability: Dry, mature skin
  • Shelf Life: 1 year

8. Sunflower Oil

  • Benefits: Rich in Vitamin E, soothing
  • Skin Type Suitability: Normal to oily skin
  • Shelf Life: 1 year

9. Sweet Almond Oil

  • Benefits: Softening, soothing
  • Skin Type Suitability: Dry, sensitive skin
  • Shelf Life: 1 year

10. Apricot Kernel Oil

  • Benefits: Revitalizing, anti-inflammatory
  • Skin Type Suitability: All skin types
  • Shelf Life: 1 year

Comparison Table of Top 10 Massage Oils

Massage OilBenefitsSkin Type SuitabilityShelf Life
Coconut OilHydrating, antimicrobialAll skin types2 years
Almond OilNourishing, anti-inflammatorySensitive skin1 year
Jojoba OilMoisturizing, non-comedogenicOily, acne-proneIndefinite
Olive OilRich in antioxidants, moisturizingDry skin2 years
Argan OilAnti-aging, hydratingAll skin types2 years
Grapeseed OilLightweight, non-greasyAcne-prone skin6 months
Avocado OilDeeply moisturizing, anti-inflammatoryDry, mature skin1 year
Sunflower OilRich in Vitamin E, soothingNormal to oily skin1 year
Sweet Almond OilSoftening, soothingDry, sensitive skin1 year
Apricot Kernel OilRevitalizing, anti-inflammatoryAll skin types1 year

Pros and Cons of Each Oil for Different Massage Techniques

In this section, we will discuss the pros and cons of each oil for different massage techniques, focusing on low-friction and high-friction massages.

Coconut Oil

Pros

  • Highly moisturizing, making it suitable for low-friction massages1
  • Non-greasy and easily absorbed, making it ideal for high-friction massages1
  • Has a pleasant, mild scent2
  • Does not stain sheets or towels2

Cons

  • Can be very greasy and slippery, making cleanup a bit challenging1
  • May drip and spread over wide areas during use1

Sweet Almond Oil

Pros

  • Light and non-greasy, making it suitable for high-friction massages2
  • Has a pleasantly mild scent2
  • Rich in minerals and vitamins, providing nourishment to the skin2
  • Non-allergenic and safe for most skin types2

Cons

  • May require frequent reapplication due to its light texture2

Grapeseed Oil

Pros

  • Basically fragrance-free, making it a great base for essential oil blends2
  • Absorbs very well, allowing for easy transfer of essential oil benefits2
  • Has a silky feeling, making it a luxurious choice for massages2

Cons

  • A bit pricier than other oils2

Jojoba Oil

Pros

  • Light and quickly absorbed, making it suitable for high-friction massages2
  • Has a texture similar to the body’s natural sebum, making it gentle on sensitive skin2
  • Antibacterial properties that can help reduce redness and rashes2

Cons

  • More expensive than other oils2
  • May require more frequent reapplication due to its light texture2

Sesame Oil

Pros

  • Has been used for centuries in Ayurvedic medicine for nourishing and detoxifying the body2
  • Strong medicinal benefits, making it a popular choice for massages2
  • Provides good protection against infections, especially useful for outdoor activities2

Cons

  • Has a heavy, nutty scent that may not appeal to everyone2

Apricot Kernel Oil

Pros

  • Rich in vitamins E, A, and essential fatty acids, providing excellent nourishment to the skin2
  • Has a pale yellow color, light texture, and sweet fragrance, making it a popular choice among masseurs2

Cons

  • May be more expensive than other oils2

Lavender Essential Oil

Pros

  • Popular choice for low-friction massages due to its relaxing and soothing properties3
  • Has a calming effect that can promote better sleep3

Cons

  • May not be suitable for high-friction massages due to its low viscosity3

Rose Geranium Essential Oil

Pros

  • Potent massage oil with health-related properties that can relieve fatigue and tension in the foot muscles3
  • Nourishes the feet and releases tension in the tissues and ligaments3

Cons

  • May not be as popular as other essential oils due to its unique scent3

Peppermint Essential Oil

Pros

  • Known for its cooling effect, providing relaxation during massages3
  • Has bioactive compounds that ensure relaxation3

Cons

  • May not be suitable for high-friction massages due to its cooling properties3

Chamomile Essential Oil

Pros

  • Gentle oil that can be used by everyone, making it suitable for sensitive skin3
  • Can be diluted with carrier oils for relaxation3

Cons

  • May not provide the same level of nourishment as carrier oils3

Niaouli Essential Oil

Pros

  • Provides good protection against infections, making it useful for outdoor activities3
  • Can be applied to the foot in case of insect bites, burs, cuts, and skin problems3

Cons

  • Not as popular as other essential oils due to its unique scent3

Helichrysum Essential Oil

Pros

  • Can significantly relax muscles and joints3
  • Has a pleasant aroma3

Cons

  • May not be as widely available as other essential oils3

By understanding the pros and cons of each oil, you can make an informed decision when choosing the right massage oil for your specific needs.

Read Also: Yellow Nail Designs.

FAQs Section

What are the benefits of using massage oils?

Massage oils enhance skin hydration, promote relaxation, and can have therapeutic effects on the body.

Read Also: Neck Botox.

How do I choose the right massage oil for my skin type?

Consider your skin type and any allergies you may have to select a suitable massage oil.

Read Also: Thermage Before and After.

Can I mix different massage oils together?

Yes, blending different oils can create a customized massage experience with combined benefits.

Read Also: Lash Extension Styles.

Are there any allergies I should be aware of when using massage oils?

Some oils may trigger allergic reactions, so it’s essential to perform a patch test before full-body application.

Read Also: Marula Oil for Hair.

How often should I use massage oils for best results?

The frequency of use depends on personal preference and the desired effects; regular use can maintain skin health and relaxation benefits.

Read Also: Pull Ups While Pregnant.

Conclusion

Choosing the best massage oil is a personal decision based on skin type, preferences, and desired benefits. Experimenting with different oils can help you discover the perfect match for your massage needs. Whether you seek relaxation, skin nourishment, or therapeutic effects, the right massage oil can enhance your massage experience and promote overall well-being. Explore the diverse world of massage oils to find the perfect blend for your next soothing massage session.

Read Also: Walnut Oil.

Continue Reading

Beauty Tips

Marula Oil for Hair Health: Nourish and Protect

Published

on

marula oil for hair

Here is your complete guide to marula oil for hair

Introduction to Marula Oil for Hair

Marula oil is a popular ingredient in hair care products, and for good reason. This lightweight, nutrient-rich oil is derived from the nuts of the marula tree, which is native to southern Africa. Marula oil is packed with antioxidants, vitamins, and essential fatty acids that can help to improve the health and appearance of your hair. In this article, we will explore the benefits of marula oil for hair, how to use it, and the best products to look for. We will also answer some frequently asked questions about this amazing oil.

What is Marula Oil?

Marula oil is extracted from the kernels of the Marula fruit, scientifically known as Sclerocarya birrea. This tree, also known as the “Elephant Tree” or “King of African Trees,” thrives in the arid landscapes of southern Africa. The extraction process involves cold-pressing the kernels to retain its potent nutrients, resulting in a lightweight, non-greasy oil with a pale yellow hue.

Comparison of Marula Oil and Other Popular Hair Oils

OilBenefits
Marula OilLightweight, absorbs quickly, high in antioxidants, vitamins, and essential fatty acids
Coconut OilHeavy, takes time to absorb, high in saturated fats, good for deep conditioning
Argan OilHeavy, takes time to absorb, high in vitamin E, good for repairing damaged hair
Olive OilHeavy, takes time to absorb, high in monounsaturated fats, good for deep conditioning
Jojoba OilLightweight, absorbs quickly, similar to sebum, good for balancing oil production

Benefits of Marula Oil for Hair

Marula oil is a versatile ingredient that can offer many benefits for your hair. Here are some of the ways that marula oil can help:

Moisturizing Properties

It is a lightweight oil that is easily absorbed by the hair, making it an excellent moisturizer. It can help to hydrate and nourish dry, brittle hair, leaving it soft, shiny, and manageable.

Anti-inflammatory Properties

Marula oil has anti-inflammatory properties, which can help to soothe a dry, itchy scalp. It can also help to reduce redness and irritation, making it a great option for those with sensitive skin.

UV Protection

Marula contains antioxidants that can help to protect your hair from the damaging effects of the sun. It can help to prevent your hair from becoming dry, brittle, and damaged by UV rays.

Hair Growth Promotion

Marula is rich in nutrients that can help to promote hair growth. It can help to strengthen the hair follicles, reduce hair fall, and improve the overall health of your hair.

Damage Repair

Marula is high in essential fatty acids, which can help to repair damaged hair. It can help to smooth the cuticle, reduce frizz, and restore shine to your hair.

Styling and Finishing

It can also be used as a styling and finishing product. It can help to tame flyaways, add shine, and protect your hair from heat damage.

How to Use Marula Oil for Hair

Marula is easy to use and can be incorporated into your hair care routine in a number of ways. Here are some tips for using marula for your hair:

Choosing the Right Marula Oil

When choosing marula oil, look for a high-quality, cold-pressed oil that is 100% pure and natural. Avoid oils that contain additives, fragrances, or other ingredients that can be harmful to your hair.

Application Techniques

Marula can be applied to damp or dry hair. To apply, simply place a few drops of oil in the palm of your hand and rub your hands together. Then, distribute the oil evenly throughout your hair, focusing on the ends.

Carrier Oils and Essential Oils

It can be mixed with other oils, such as carrier oils or essential oils, to enhance its benefits. Some popular carrier oils for marula oil include jojoba oil, coconut oil, and olive oil.

Essential oils, such as lavender oil or rosemary oil, can be added to marula to promote hair growth and soothe a dry, itchy scalp.

Frequency of Use

Marula can be used daily or as needed. If you have dry, brittle hair, you may want to use this oil more frequently. If you have oily hair, you may want to use marula oil less frequently to avoid weighing down your hair.

Marula Oil Hair Products

It is a popular ingredient in hair care products, and there are many products available that contain this amazing oil. Here are some of the best marula oil products to look for:

Top Marula Oil Hair Products

Product NameBrandProduct TypeKey FeaturesPros and Cons
Marula Hair OilAfrican BotanicsHair OilLightweight, absorbs quickly, high in antioxidants, vitamins, and essential fatty acidsExpensive, small bottle
Marula Hydrating ShampooJohn Masters OrganicsShampooGentle, hydrating, sulfate-free, contains marula oil and other natural ingredientsMay not lather well, expensive
Marula Deep Conditioning MaskShea MoistureHair MaskDeeply hydrating, contains marula oil, shea butter, and other natural ingredientsMay be too heavy for fine hair, takes time to rinse out
Marula Leave-in ConditionerOGXLeave-in ConditionerLightweight, detangles, adds shine, contains marula oil and other natural ingredientsMay not be hydrating enough for very dry hair, can be sticky
Marula Styling CreamLiving ProofStyling CreamLightweight, adds texture, reduces frizz, contains marula oil and other natural ingredientsMay be too heavy for fine hair, expensive

Marula Oil Hair Care Routine

It can be incorporated into your hair care routine in a number of ways. Here is a sample marula oil care routine:

Cleansing

Start by cleansing your hair with a gentle, hydrating shampoo that contains marula. This will help to remove dirt, oil, and other impurities from your hair, while also providing hydration and nourishment.

Conditioning

After cleansing, apply a deep conditioning mask that contains marula oil. This will help to deeply hydrate and nourish your hair, leaving it soft, shiny, and manageable.

Styling

Before styling your hair, apply a styling cream that contains marula oil. This will help to add texture, reduce frizz, and protect your hair from heat damage.

Maintenance

To maintain the health and appearance of your hair, use a leave-in conditioner or hair oil that contains marula. This will help to keep your hair hydrated and nourished, while also adding shine and reducing frizz.

FAQs

Can marula oil be used on all hair types?

It can be used on all hair types, including dry, brittle, oily, and damaged hair. It is a lightweight oil that is easily absorbed by the hair, making it a great option for those with fine or oily hair.

Read Also: Lip Filler Before and After.

How often should marula oil be used?

    Marula oil can be used daily or as needed. If you have dry, brittle hair, you may want to use marula more frequently. If you have oily hair, you may want to use marula less frequently to avoid weighing down your hair.

    Read Also: Before and After Microneedling.

    Can marula oil be used on wet or dry hair?

      It can be used on both wet and dry hair. If you have dry, brittle hair, you may want to apply marula to damp hair before styling. If you have oily hair, you may want to apply marula to dry hair to add shine and reduce frizz.

      Read Also: Brazilian Blowout Before and After.

      Is marula oil better than argan oil for hair?

        Both marula and argan oil are excellent oils for hair, and each has its own unique benefits. Marula oil is a lightweight oil that is easily absorbed by the hair, making it a great option for those with fine or oily hair. Argan oil is a heavier oil that is better suited for those with dry, damaged hair.

        Read Also: Yellow Nail Designs.

        Can marula oil be used to treat dandruff?

          Marula oil has anti-inflammatory properties, which can help to soothe a dry, itchy scalp. It can also help to reduce redness and irritation, making it a great option for those with sensitive skin. However, if you have severe dandruff, you may want to talk to your doctor or a dermatologist for treatment options.

          Read Also: Neck Botox.

          Conclusion

          Marula oil is a versatile ingredient that can offer many benefits for your hair. It is a lightweight oil that is easily absorbed by the hair, making it a great option for those with fine or oily hair. Marula oil is packed with antioxidants, vitamins, and essential fatty acids that can help to improve the health and appearance of your hair.

          Read Also: Thermage Before and After.

          If you are looking to incorporate marula oil into your hair care routine, there are many products available that contain this amazing oil. From hair oils and shampoos to hair masks and styling creams, there is a marula oil product for every hair type and need.

          Read Also: Pull Ups While Pregnant.

          So, go ahead and give marula oil a try. Your hair will thank you!

          Read Also: Lash Extension Styles.

          Continue Reading

          Beauty Tips

          Lash Extension Styles: Mastering the Art of Beautiful Eyelashes

          Published

          on

          lash extension styles

          Here is your complete guide to lash extension styles

          Introduction to Lash Extension Styles

          Lash extensions have become a popular beauty trend in recent years, offering a way to enhance the natural beauty of the eyes without the need for daily makeup application. But with so many different lash extension styles to choose from, it can be overwhelming to know which one is right for you. In this article, we’ll explore the different types of lash extension styles, their pros and cons, and how to apply them.

          What are Lash Extension Styles?

          Lash extension styles refer to the different ways that lash extensions can be applied to enhance the natural beauty of the eyes. From classic to mega volume, there are many different options to choose from, each with its own unique look and benefits.

          Why are Lash Extension Styles Important?

          They can help to enhance the natural beauty of the eyes, making them look bigger, fuller, and more defined. They can also save time and money on daily makeup application, as well as provide a more natural and long-lasting alternative to false lashes.

          Who are Lash Extension Styles for?

          They are for anyone who wants to enhance the natural beauty of their eyes, whether for a special occasion or as part of their daily beauty routine. They are suitable for all ages and can be customized to suit individual eye shapes and preferences.

          How to Choose the Right Lash Extension Style

          Selecting the perfect lash extension style requires careful consideration of several factors, including your face shape, eye shape, and lifestyle preferences. Here’s a step-by-step guide to help you navigate the decision-making process:

          Consideration Factors

          • Personal Style: Are you drawn to a natural, understated look, or do you prefer something more dramatic and eye-catching?
          • Occasion: Will you be wearing your lash extensions for everyday wear or a special event?
          • Comfort Level: Are you comfortable with the maintenance requirements associated with certain lash extension styles?

          Face Shape Guide

          • Round Face: Angular lash styles, such as cat-eye or elongated lashes, can help elongate the face and create a more balanced appearance.
          • Square Face: Soft, wispy lash styles, like doll or babydoll lashes, can soften the angles of a square face and add femininity.
          • Oval Face: Oval faces are versatile and can pull off various lash styles, so feel free to experiment with different looks.
          • Heart-Shaped Face: Fluttery, tapered lashes that are longest at the outer corners can complement a heart-shaped face by drawing attention to the eyes.

          Eye Shape Guide

          • Almond Eyes: Almond-shaped eyes are well-suited to most lash extension, making them the perfect canvas for experimentation.
          • Round Eyes: To elongate round eyes, opt for lashes that are longer in the center and shorter at the inner and outer corners.
          • Hooded Eyes: Focus on lifting the eyes with curled lashes and avoiding styles that are too heavy or dense, which can weigh down the lids.
          • Monolid Eyes: Curled lashes with varying lengths can create the illusion of depth and dimension on monolid eyes.

          Lifestyle and Maintenance Considerations

          • Active Lifestyle: If you lead an active lifestyle or enjoy swimming or exercising regularly, opt for a durable lash extension style that can withstand moisture and movement.
          • Maintenance Routine: Consider how much time and effort you’re willing to devote to maintaining your lash extensions. While some styles require minimal upkeep, others may necessitate more frequent touch-ups.

          Different Types of Styles

          Lash Extension StyleDescription
          ClassicSingle lash extension applied per natural lash
          VolumeMultiple lash extensions applied per natural lash for a fuller look
          HybridCombination of classic and volume lash extensions
          Mega VolumeMore than 2-3 lash extensions applied per natural lash for a dramatic look
          Russian VolumeThinner lash extensions applied in a fan-like shape for a more natural look
          ColoredLash extensions in various colors for a bold and unique look
          3D, 4D, 5DIncreased number of lash extensions applied per fan for a fuller look
          Baby DollLonger lashes in the center and shorter lashes on the sides for a doe-eyed look
          Cat EyeLonger lashes on the outer corners for an almond-shaped look
          Kitten EyeSubtle cat eye look for a more natural appearance

          Classic Lash Extension Styles

          Classic lash extension styles involve the application of a single lash extension to each natural lash. This creates a subtle and natural-looking enhancement to the eyes.

          Pros of Classic Lash Extension Styles

          • Natural-looking enhancement
          • Suitable for all eye shapes
          • Low maintenance

          Cons

          • May not provide as much volume as other styles
          • Can be more time-consuming to apply

          How to Apply Classic Lash Extension Styles

          1. Clean the natural lashes thoroughly
          2. Apply a bonding agent to the natural lash
          3. Place the lash extension onto the natural lash, ensuring it is aligned with the natural growth direction
          4. Allow the bonding agent to dry
          5. Repeat for each natural lash

          Volume Lash Extension Styles

          Volume lash styles involve the application of multiple lash extensions to each natural lash, creating a fuller and more voluminous look.

          Pros of Volume Lash Extension Styles

          • Fuller and more voluminous appearance
          • Customizable to individual preferences
          • Suitable for all eye shapes

          Cons

          • May require more maintenance than classic styles
          • Can be more expensive than classic styles

          How to Apply Volume Lash Extension Styles

          1. Clean the natural lashes thoroughly
          2. Apply a bonding agent to the natural lash
          3. Place the lash extension fan onto the natural lash, ensuring it is aligned with the natural growth direction
          4. Allow the bonding agent to dry
          5. Repeat for each natural lash

          Hybrid Lash Extension Styles

          Hybrid lash styles combine the benefits of classic and volume styles, creating a natural-looking enhancement with added volume.

          Pros of Hybrid Lash Extension Styles

          • Natural-looking enhancement with added volume
          • Customizable to individual preferences
          • Suitable for all eye shapes

          Cons

          • May require more maintenance than classic styles
          • Can be more expensive than classic styles

          How to Apply

          1. Clean the natural lashes thoroughly
          2. Apply a bonding agent to the natural lash
          3. Place a combination of single and multiple lash extensions onto the natural lash, ensuring they are aligned with the natural growth direction
          4. Allow the bonding agent to dry
          5. Repeat for each natural lash

          Mega Volume Lash Extension Styles

          Mega volume lash styles involve the application of more than 2-3 lash extensions to each natural lash, creating a dramatic and voluminous look.

          Pros of Mega Volume Lash Extension Styles

          • Dramatic and voluminous appearance
          • Customizable to individual preferences
          • Suitable for special occasions

          Cons

          • May require more maintenance than classic styles
          • Can be more expensive than classic styles
          • May not be suitable for everyday wear

          How to Apply

          1. Clean the natural lashes thoroughly
          2. Apply a bonding agent to the natural lash
          3. Place a fan of multiple lash extensions onto the natural lash, ensuring it is aligned with the natural growth direction
          4. Allow the bonding agent to dry
          5. Repeat for each natural lash

          Russian Volume Lash Extension Styles

          Russian volume lash styles involve the application of thinner lash extensions in a fan-like shape, creating a more natural and subtle enhancement.

          Pros of Russian Volume Lash Extension Styles

          • More natural and subtle enhancement
          • Customizable to individual preferences
          • Suitable for all eye shapes

          Cons

          • May require more maintenance than classic styles
          • Can be more expensive than classic styles

          How to Apply

          1. Clean the natural lashes thoroughly
          2. Apply a bonding agent to the natural lash
          3. Place a fan of thinner lash extensions onto the natural lash, ensuring it is aligned with the natural growth direction
          4. Allow the bonding agent to dry
          5. Repeat for each natural lash

          Colored Lash Extension Styles

          They involve the application of lash extensions in various colors, creating a bold and unique look.

          Pros of Colored Lash Extension Styles

          • Bold and unique appearance
          • Customizable to individual preferences
          • Suitable for special occasions

          Cons

          • May not be suitable for everyday wear
          • May require more maintenance than classic styles

          How to Apply

          1. Clean the natural lashes thoroughly
          2. Apply a bonding agent to the natural lash
          3. Place a lash extension in the desired color onto the natural lash, ensuring it is aligned with the natural growth direction
          4. Allow the bonding agent to dry
          5. Repeat for each natural lash

          Cost of Lash Extension Styles

          StyleFull SetRefill
          Classic$150$75
          Hybrid$190$95
          Volume$227$113
          Mega Volume$345$220

          The cost of lash extension varies depending on the style, material, duration, and lash artist’s technique. On average, a full set of classic lash extensions costs around $150, while a full set of Russian volume lashes is more expensive and is usually around $230. Hybrid lashes, which are a combination of classic and volume lashes, typically cost around $190. The cost of lash extensions infills is usually 50-70% of the full set price, and is required every 3-4 weeks to maintain the fresh, fluffy look of lash extensions. The more often you have fill-ins, the less you will pay. It is important to ensure the quality of lash extensions before applying them to your eyes, as health and safety matter the most.

          Read Also: Lip Filler Before and After.

          FAQs

          How Long Do Lash Extension Styles Last?

          Lash extension can last anywhere from 2-4 weeks, depending on the individual’s natural lash growth cycle and maintenance.

          Read Also: Before and After Microneedling.

          Are Lash Extension Styles Safe?

          Yes, lash styles are safe when applied by a trained and certified professional. However, it is important to follow proper aftercare instructions to ensure the health and safety of the natural lashes.

          Read Also: Brazilian Blowout Before and After.

          How Much Do Lash Extension Styles Cost?

          The cost of lash extension can vary depending on the type of style, the number of lashes applied, and the location of the salon. On average, classic lash extensioncan range from $100-$200, while volume and mega volume styles can range from $200-$400.

          Read Also: Yellow Nail Designs.

          Can I Wear Makeup with Lash Extension Styles?

          Yes, makeup can be worn with lash extension , but it is important to avoid oil-based products and heavy eyeliners that can break down the bonding agent.

          Read Also: Neck Botox.

          How Do I Care for My Lash Extension Styles?

          Proper care and maintenance are essential for the health and longevity of lash extension. This includes avoiding water and oil-based products for the first 24 hours, brushing the lashes daily, and avoiding rubbing or pulling on the lashes.

          Read Also: Pull Ups While Pregnant.

          Conclusion

          Lash extension styles offer a way to enhance the natural beauty of the eyes, providing a more natural and long-lasting alternative to false lashes. With so many different styles to choose from, it’s important to consider individual preferences and eye shapes when selecting the right style. Proper care and maintenance are also essential for the health and longevity of Lash styles.

          Read Also: Thermage Before and After.

          Continue Reading

          Trending