Connect with us

Beauty Tips

How to Straightener Hair: A Comprehensive Guide

Published

on

how to straightener hair

Here is your complete guide to how to straightener hair

Introduction to How to Straightener Hair

Hair straightening is a popular technique that allows you to transform your locks from curly or wavy to straight and smooth. Whether you want a sleek look for a special occasion or simply enjoy the versatility of straight hair, mastering the art of hair straightening can give you the results you desire. In this guide, we will explore various methods, essential tips, and post-straightening care to help you achieve gorgeous, straight hair at home. So how to straightener hair? What do you need to know about how to straightener hair. Here is your complete and ultimate guide to how to straightener hair.

Understanding Hair Straightening

What is Hair Straightening?

Hair straightening is a process of altering the natural texture of your hair to achieve a straight, sleek look. It involves using heat and/or chemicals to break the bonds in the hair shaft temporarily, allowing the hair to be reshaped into a straighter form. The effects of hair straightening can last until the hair grows out or is exposed to moisture.

Types of Hair Straighteners

There are different types of hair straighteners available in the market, each with its own advantages and considerations. Here are the most common types:

  1. Flat Irons: Also known as hair straighteners, flat irons use heated plates to straighten the hair strands. They offer precision and control during the straightening process.
  2. Hair Straightening Brushes: These brushes combine the functionality of a brush and a flat iron. They use heat to help straighten the hair as you brush through it.
  3. Chemical Straightening: This method involves using chemical treatments to permanently alter the structure of the hair, resulting in long-lasting straightness.

It’s important to choose the right type of hair straightener based on your hair type, desired results, and level of expertise. Consider the pros and cons of each method to determine which one suits you best.

Preparing Your Hair for Straightening

To ensure optimal results and minimize potential damage, it is crucial to prepare your hair properly before straightening. Here are some essential steps to follow:

Washing and Conditioning

  • Use a smoothing or anti-frizz shampoo and conditioner to prepare your hair for straightening.
  • Rinse your hair thoroughly to remove any product build-up that can interfere with the straightening process.
  • Towel-dry your hair gently to remove excess moisture. Avoid rubbing vigorously, as this can cause frizz and damage.

Applying Heat Protectant

  • Apply a heat protectant spray, serum, or cream to shield your hair from the damaging effects of heat styling tools.
  • Ensure even distribution of the product by combing it through your hair using a wide-toothed comb.
  • Pay extra attention to the ends and more vulnerable areas of your hair.

Drying Your Hair

  • Air-dry your hair or use a blow dryer on a low heat setting until it is about 80% dry.
  • Gently comb through your hair with a wide-toothed comb or detangling brush to remove any knots or tangles.

By following these steps, you create a solid foundation for successful hair straightening while minimizing potential damage.

how to straightener hair

Straightening Techniques

Now that you have prepared your hair, it’s time to dive into the various straightening techniques. Depending on your preferences and the tools you have at hand, you can choose from the following methods:
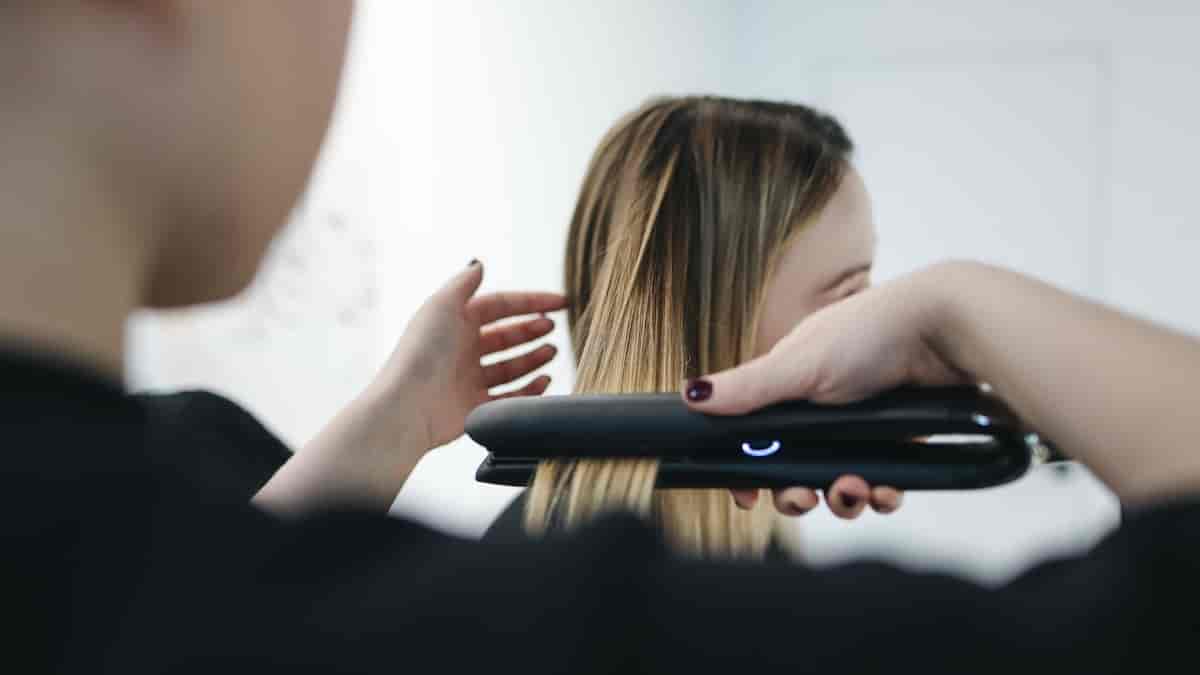
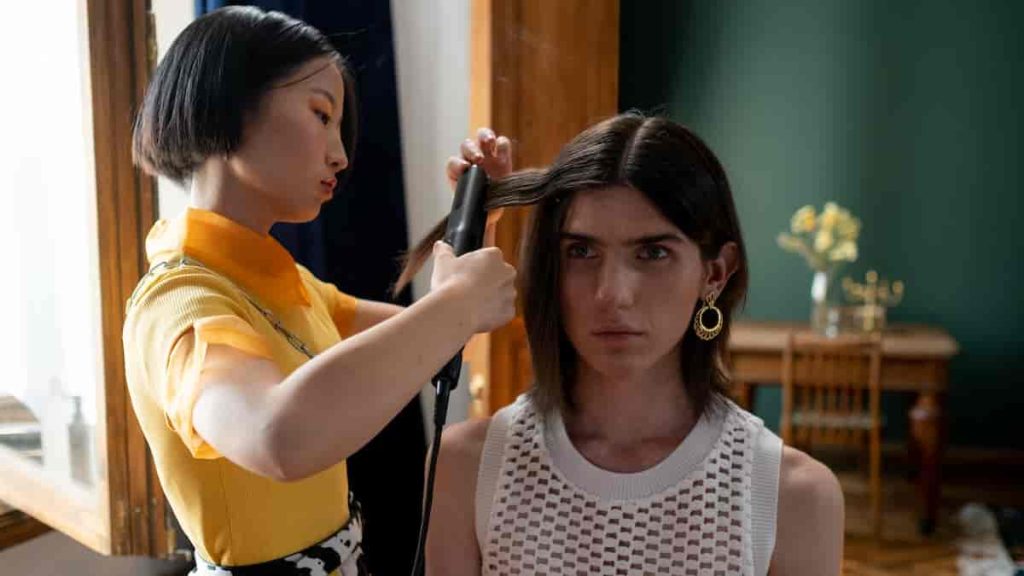
Using a Flat Iron

Achieving sleek, straight hair with a flat iron requires proper technique and a little practice. Follow these steps for best results:

  1. Section Your Hair: Divide your hair into manageable sections using hair clips or hair ties. This ensures thorough straightening and prevents missed spots.
  2. Adjust the Temperature: Set the temperature on your flat iron based on your hair type. Lower temperatures are suitable for fine or damaged hair, while higher temperatures work better for thick or coarse hair.
  3. Start Straightening: Take a small section of hair and clamp the flat iron near the roots. Gently glide it down towards the ends, following the natural flow of your hair. Repeat until all sections are straightened.

Remember to work with small sections to ensure even heat distribution and smoother results. Use the tables below as a reference for suitable temperature settings and recommended flat iron sizes based on your hair type:

Hair TypeRecommended Temperature Range
Fine300°F – 350°F (150°C – 180°C)
Normal350°F – 380°F (180°C – 195°C)
Thick380°F – 450°F (195°C – 230°C)
Hair TypeRecommended Flat Iron Size
Short0.5″ – 1″ (1.3 cm – 2.5 cm)
Medium1″ – 1.5″ (2.5 cm – 3.8 cm)
Long1.5″ – 2″ (3.8 cm – 5 cm)

Using a Hair Straightening Brush

Hair straightening brushes offer a convenient alternative to flat irons. Follow these steps for effective straightening with a hair straightening brush:

  1. Prepare Your Hair: Brush your hair to remove any knots or tangles. Apply a heat protectant product for added protection.
  2. Section Your Hair: Divide your hair into sections using clips or ties.
  3. Start Brushing: Take a section of hair and brush through it with the hair straightening brush, starting from the roots and working towards the ends. Repeat until all sections are straightened.

Hair straightening brushes are suitable for various hair types and provide a more gentle heat application compared to flat irons. They are especially useful for quick touch-ups or achieving a more natural look.

Other Straightening Methods

Apart from flat irons and hair straightening brushes, there are alternative methods you can explore, including chemical straightening or keratin treatments. However, these methods often require professional assistance and should be approached with caution. Consult with a hairstylist or professional before considering such treatments to ensure they are suitable for your hair condition and desired results.

how to straightener hair

Post-Straightening Care

Once you have successfully straightened your hair, it’s important to maintain its health and appearance. Here are some key steps for post-straightening care:

Applying Hair Serums or Oils

  • After straightening, apply a hair serum or oil to add shine, reduce frizz, and protect your hair from environmental damage.
  • Use a small amount of the product and spread it evenly through your hair, focusing on the ends.

Avoiding Excessive Heat and Humidity

  • Limit the use of heat styling tools to prevent heat damage and maintain the integrity of your straightened hair.
  • Protect your hair from excessive humidity by using anti-humidity hair products, such as serums or sprays.

By following these post-straightening care tips, you can extend the longevity of your straightened hair and keep it looking smooth and healthy.

Steps for Straightening with a Flat Iron

StepDescription
1Start with clean, dry hair that has been properly prepared with a heat protectant.
2Divide your hair into manageable sections using hair clips or ties.
3Set your flat iron to the appropriate temperature for your hair type.
4Take a small section of hair and clamp the flat iron near the roots, ensuring the plates touch the hair.
5Gently glide the flat iron down the hair shaft towards the ends, following the natural flow of your hair.
6Repeat steps 4 and 5 with each section of hair until all sections are straightened.
7Take your time and go slowly, especially if you’re new to using a flat iron.
8After straightening, apply a hair serum or oil to add shine and reduce frizz.

Remember to adjust the temperature and use proper technique based on your hair type and desired results. Take care to avoid excessive heat exposure and practice caution to prevent burns or damage to your hair.

Steps for Straightening with a Hairdryer

StepDescription
1Start with clean, towel-dried hair.
2Apply a heat protectant spray, serum, or cream to shield your hair from heat damage.
3Divide your hair into sections using hair clips or ties.
4Attach a concentrator nozzle to your hairdryer for more focused airflow.
5Take a section of hair and hold it taut with a brush or comb.
6Point the hairdryer downward along the hair shaft and follow the brush or comb, directing the airflow.
7Move the brush or comb slowly down the hair, simultaneously drying and straightening the section.
8Repeat steps 5-7 with each section of hair until all sections are straightened.
9For a sleeker finish, use a round brush to smooth the ends and add volume at the roots.
10After straightening, apply a hair serum or oil to add shine and reduce frizz.

Ensure that your hairdryer is set to an appropriate heat and airflow setting. Take care not to hold the dryer too close to your hair to avoid excessive heat damage. Practice patience and thoroughness to achieve desired straightness.

Steps for Keeping Hair Straight

StepDescription
1Avoid touching your hair excessively, as the natural oils from your hands can cause it to become greasy or frizzy.
2Use a silk or satin pillowcase to reduce friction and prevent your hair from getting tangled while you sleep.
3Tie your hair in a loose bun or braid before bedtime to minimize movement and help maintain straightness.
4Avoid exposing your hair to excessive humidity, as it can cause frizz and disrupt the straightened style.
5Use anti-humidity hair products, such as serums or sprays, to help seal the hair cuticles and prevent moisture absorption.
6Limit the use of heat styling tools, as frequent exposure to high temperatures can damage your hair over time.
7Apply a small amount of hair serum or oil daily to add shine, reduce frizz, and keep your hair looking sleek.
8Schedule regular trims to get rid of split ends and maintain the overall health of your straightened hair.
9Protect your hair from sun damage by wearing a hat or using UV protection sprays when spending time outdoors.
10Consider using a dry shampoo between washes to absorb excess oil and keep your hair looking fresh and voluminous.

By following these steps, you can help prolong the straightness of your hair and keep it looking sleek and polished. Remember to prioritize hair health and use suitable products for your hair type.

Frequently Asked Questions (FAQs)

Can I straighten my hair without using heat?

Yes, there are alternative methods such as heatless straightening techniques or using hair straightening creams. However, the results may vary, and they may not achieve the same level of straightness as heat styling methods.

Read More About Russian Lips.

How often can I straighten my hair?

It’s best to avoid excessive heat styling to prevent damage. Ideally, limit straightening to a few times per week and ensure you use proper heat protectants and post-straightening care.

Read More about How to Make Clear Skin.

Will hair straightening damage my hair?

While heat styling can cause some damage if not done properly, using the right techniques and products can minimize the risk. It’s important to prioritize hair health and follow good hair care practices.

Read More About Fruit with High Protein.

How long does hair straightening last?

The duration of hair straightening results varies depending on factors such as hair type, aftercare, and exposure to moisture. On average, straightened hair can last until new hair growth or until the hair comes into contact with water.

Read More About Best Places to Visit in December for Snowfall.

Can I straighten my hair if it’s already damaged?

It’s generally recommended to avoid heat styling on severely damaged hair. Instead, focus on repairing and nourishing your hair before considering straightening methods. Consult with a hairstylist for personalized advice.

Read More About Gain Weight on Period.

How to do hair straightening step by step?

To straighten your hair step by step, follow these instructions:

  1. Start by washing your hair with a smoothing or anti-frizz shampoo and conditioner.
  2. Towel-dry your hair gently to remove excess moisture.
  3. Apply a heat protectant spray, serum, or cream to shield your hair from heat damage.
  4. Divide your hair into sections using hair clips or ties.
  5. Adjust the temperature on your flat iron based on your hair type.
  6. Take a small section of hair and clamp the flat iron near the roots.
  7. Gently glide the flat iron down towards the ends, following the natural flow of your hair.
  8. Repeat this process until all sections of your hair are straightened.
  9. After straightening, apply a hair serum or oil to add shine and reduce frizz.
  10. Limit the use of heat styling tools to maintain the health of your straightened hair.

Read More About Russian Lips vs Normal Filler.

What should I apply before straightening my hair?

Before straightening your hair, it is important to apply a heat protectant product. Heat protectants create a barrier between your hair and the heat from styling tools, minimizing damage. Look for a heat protectant spray, serum, or cream that is specifically designed for use with heat styling tools. Apply the product evenly throughout your hair, paying extra attention to the ends and more vulnerable areas. Comb the product through your hair using a wide-toothed comb to ensure even distribution.

Read More About Dating Advice for Woman.

How do you use a hair straightener for beginners?

Using a hair straightener for the first time can be intimidating, but with the right technique, you can achieve great results. Here are some tips for beginners:

  1. Start with clean, dry hair that has been properly prepared with a heat protectant.
  2. Divide your hair into manageable sections using hair clips or ties.
  3. Set your hair straightener to the appropriate temperature for your hair type.
  4. Take a small section of hair and clamp the straightener near the roots, making sure the plates are touching the hair.
  5. Gently glide the straightener down the hair shaft towards the ends, following the natural flow of your hair.
  6. Repeat this process with each section of hair until all sections are straightened.
  7. Take your time and go slowly, especially if you’re new to using a straightener.
  8. After straightening, apply a hair serum or oil to add shine and reduce frizz.

Remember to practice proper safety precautions, such as turning off and unplugging the straightener when not in use, and being cautious of the hot plates to avoid burns.

Read More About Coconut Oil in Face Benefits.

What is the best method for straightening hair?

The best method for straightening hair depends on various factors, including hair type, desired results, and personal preference. The most common methods for straightening hair are:

  1. Using a Flat Iron: Flat irons are versatile and offer precise control. They work well for most hair types and allow you to straighten small sections of hair at a time.
  2. Using a Hair Straightening Brush: Hair straightening brushes are convenient and combine the functionality of a brush and a straightener. They are suitable for quick touch-ups and achieving a more natural look.
  3. Chemical Straightening: Chemical straightening, such as relaxing or keratin treatments, permanently alters the structure of the hair. This method provides long-lasting straightness but should be performed by a professional and requires careful consideration.

Choose the method that best suits your hair type, time availability, and desired results. It’s important to prioritize hair health and use proper techniques and products to minimize damage.

Read More About How Long Does Breast Augmentation Surgery Take?

Conclusion

Mastering the art of hair straightening can be a game-changer for achieving sleek, straight locks. By understanding the techniques, preparing your hair properly, and following post-straightening care, you can enjoy the beauty and versatility of straight hair. Remember to always prioritize hair health and choose the methods that best suit your hair type and condition. Embrace your straightened hair with confidence and enjoy the stunning results!

Read More About How Long Does It Take for Hair to Grow Back?

Read More About How to Avoid Wedding Stress.

Continue Reading
Click to comment

Leave a Reply

Your email address will not be published. Required fields are marked *

Beauty Tips

Black Dress with Black Gloves: Mastering the Chic Fusion

Published

on

black dress with black gloves

Here is your complete guide to black dress with black gloves

Introduction to Black Dress with Black Gloves

Black dress with black gloves is a timeless and elegant fashion choice that has been a staple in women’s wardrobes for decades. This classic combination exudes sophistication and style, making it perfect for a variety of occasions. Whether you’re attending a formal event, a cocktail party, or a night out on the town, a black dress with black gloves is sure to turn heads and make a lasting impression. In this article, we will explore the various styles, pairings, and accessories that can be used to enhance this iconic look.

The allure of the black dress with black gloves ensemble is undeniable. It’s not just a style choice; it’s a statement, a testament to refined taste and timeless sophistication. In this article, we delve into the historical significance, styling tips, celebrity influences, and much more surrounding this iconic fashion combination.

History and Evolution

The origins of this ensemble can be traced back through cultural and historical influences. From the elegance of Victorian fashion to iconic Hollywood moments, the black dress and gloves have evolved, maintaining their allure through generations.

Styling Tips for the Perfect Ensemble

  • Choosing the Right Pairing: The key lies in harmonizing the dress and glove styles, lengths, and textures.
  • Accessorizing with Finesse: Complementing this ensemble with shoes, jewelry, and handbags to accentuate the elegance.
  • Versatility for All Seasons: Adapting this ensemble to different seasons and occasions effortlessly.

The Elegance of Black Dresses with Black Gloves

The sleek and sophisticated look of black dresses with black gloves has been a fashion favorite for centuries. This classic combination adds a touch of class to any outfit and is perfect for a variety of occasions. Whether you’re attending a formal event, a cocktail party, or a night out on the town, a black dress with black gloves is sure to turn heads and make a lasting impression.

Different Styles of Black Dresses with Black Gloves

When it comes to black dresses with black gloves, there are a variety of styles to choose from. From mini to maxi, silk to velvet, and fitted to flowy, the options are endless. Here are some of the most popular styles of black dresses with black gloves:

StyleDescription
MiniShort and flirty, perfect for a night out on the town
MaxiLong and elegant, ideal for a formal event or a black-tie affair
SilkLuxurious and sophisticated, perfect for a special occasion
VelvetRich and opulent, great for a winter event or a holiday party
FittedSleek and sexy, perfect for a night out on the town
FlowyRomantic and ethereal, ideal for a summer wedding or a garden party

Pairing Black Dresses with Black Gloves

When it comes to pairing black dresses with black gloves, there are a few things to keep in mind. First, it’s important to choose the right pair of black gloves to complement your dress. Whether you opt for long opera gloves or short wrist-length gloves, the key is to find a pair that fits well and complements your dress. Additionally, it’s important to consider the impact of different glove styles on the overall look. For example, long opera gloves can add a touch of drama to a simple black dress, while short wrist-length gloves can create a more casual and relaxed look.

Accessorizing Black Dresses with Black Gloves

In addition to the gloves, there are a variety of accessories that can be used to enhance a black dress with black gloves. From statement handbags to layered jewelry, the options are endless. Here are some of the most popular accessories for black dresses with black gloves:

AccessoryDescription
Statement HandbagA bold and eye-catching handbag can add a pop of color to a black dress
Layered JewelryFrom necklaces to bracelets, layered jewelry can add a touch of glamour
Statement BeltA wide patent belt can add some sex appeal to a plain black dress
ScarfA silk scarf can add a touch of elegance to a black dress with black gloves
HatA chic hat can add a touch of old Hollywood glamour to a black dress

Black Dresses with Black Gloves for Different Occasions

Black dresses with black gloves are perfect for a variety of occasions. From formal events to casual outings, the classic combination is sure to turn heads and make a lasting impression. Here are some of the most popular occasions for black dresses with black gloves:

OccasionDescription
Formal EventA black-tie affair or a gala event is the perfect occasion for a black dress
Cocktail PartyA night out on the town or a cocktail party is the perfect occasion for a black dress with black gloves
Casual OutingBrunch with friends or a day at the museum is the perfect occasion for a black dress with black gloves
Special OccasionA wedding or a holiday party is the perfect occasion for a black dress with black gloves

Celebrities and Red Carpet Glamour

The red carpet has been a stage for this ensemble’s elegance, embraced by icons and celebrities who redefine fashion trends and set the tone for elegance in the spotlight.

Impact on Runways and Fashion Shows

From high fashion runways to designer showcases, this ensemble has left an indelible mark on the world of couture, inspiring collections and influencing the runway narratives.

Exploring Fabric and Texture Choices

  • Varied Fabrics: From silk’s luxurious sheen to velvet’s rich texture, choices that define elegance.
  • Textures and Patterns: Enhancing the ensemble with intricate details and patterns.

Expressing Personal Style

Customizations and personal touches infuse individualistic interpretations, allowing individuals to embrace this ensemble in a way that reflects their unique style.

Fashion Icons and Inspirations

Icons throughout history have effortlessly carried the elegance of the black dress and gloves, inspiring generations and leaving an indelible mark on fashion’s evolution.

Dress and Glove Pairing Guide

A comprehensive guide showcasing various dress and glove pairings for different occasions.

Dress StyleGlove LengthTexture
Little Black DressElbow LengthSatin
GownOpera LengthLace
A-line DressWrist LengthLeather

Seasonal Adaptations and Accessories

Highlighting accessory choices and adaptations for different seasons.

SeasonAccessories
SummerStrappy Heels, Clutch
WinterFur Stole, Boots
FallScarves, Tights

Celebrity Influences

Notable celebrities and their iconic moments in the black dress and gloves ensemble.

CelebrityIconic Moment
Audrey HepburnBreakfast at Tiffany’s
RihannaMet Gala Appearance
Grace KellyRed Carpet Perfection

Fashion Icon Inspirations

Influential fashion icons and their lasting impact on this ensemble.

IconContribution to Fashion
Coco ChanelIntroduction of the LBD
Jackie KennedyElegance in Political Scene
Marilyn MonroeSensual Elegance

Fabric and Texture Varieties

Different fabric and texture choices to enhance the elegance of the ensemble.

FabricTexture
SilkSmooth and Lustrous
VelvetRich and Luxurious
LaceDelicate and Intricate

FAQs: Insights from ‘People Also Ask’ Section

How to Choose the Right Length and Style of Gloves?

Select glove length based on the dress style and occasion. Opera-length for formal gowns and wrist-length for casual dresses.

Read Also: RealHer Metallic Bronze Eyeliner.

Can Black Gloves Be Paired with Any Black Dress?

Absolutely! The key is to match textures and styles for a cohesive look.

Read Also: Eyebrows Redhead.

What Shoes Complement a Black Dress with Black Gloves?

For a formal look, opt for elegant heels, while boots or flats can add a modern twist.

Read Also: Shooting Star Makeup.

Are There Cultural Considerations in Wearing this Ensemble?

While the ensemble carries universal elegance, cultural norms may influence accessories or glove styles.

Read Also: Is Shea Butter Vegan.

Tips for Maintaining the Elegance Throughout the Day/Night?

Choose comfortable glove fabrics, and consider the occasion when deciding on dress length to ensure ease of movement.

Read Also: Candy Made with Stevia.

Conclusion

In conclusion, black dresses with black gloves are a timeless and elegant fashion choice that is perfect for a variety of occasions. Whether you’re attending a formal event, a cocktail party, or a night out on the town, a black dress with black gloves is sure to turn heads and make a lasting impression. With the right pair of gloves and the perfect accessories, you can create a look that is both sophisticated and stylish. So why not embrace this classic combination and rock a black dress with black gloves at your next event?

Read Also: All Natural Room Spray.

Continue Reading

Beauty Tips

Is Shea Butter Vegan? A Comprehensive Guide

Published

on

is shea butter vegan

Here is your complete guide to is shea butter vegan

Introduction to Is Shea Butter Vegan

Shea butter is a hugely popular ingredient in the cosmetics industry. As it is plant-based, it’s also a staple in vegan cosmetics. In this article, we will explore the question, “Is shea butter vegan?” We will delve into the origins of shea butter, its use in cosmetics, and the controversy surrounding its vegan status. We will also discuss the relationship between shea butter and the brand Shea Moisture, and provide a detailed overview of the brand’s offerings. Additionally, we will address common FAQs and provide a list of LSI/NLP keywords related to the topic.

Shea butter is a type of plant-based fat that is extracted from the nuts of the Shea Tree, which is native to West Africa. At room temperature, this fat is solid and is full of fatty acids, vitamins, and minerals. Because of its texture and nutritional profile, shea butter is a popular ingredient for use in medicinal and cosmetic applications, especially lotions and ointments. But is shea butter vegan? In this article, we will explore the vegan status of shea butter and its use in the cosmetics industry.

What is Shea Butter?

Shea butter is a fatty substance extracted from the nuts of the African shea tree, Vitellaria paradoxa, that has several useful properties in skincare and similar applications. It is a popular ingredient in lotions, moisturizers, and other cosmetics due to its emollient properties and ability to help with redness and itching. Shea butter is also known for its high content of fatty acids, vitamins, and minerals, making it a valuable ingredient in skincare products.

Is Shea Butter Vegan?

Yes, it is 100% vegan-friendly. It is simply a fatty substance extracted from the nuts of the African shea tree, and it does not contain any animal-derived ingredients. Therefore, it is suitable for use in vegan cosmetics and skincare products.

Shea Moisture and Veganism

Shea Moisture is a popular brand that offers a range of natural and organic beauty products. While some of their products are vegan-friendly, the brand cannot claim to be entirely vegan, as some of their products contain ingredients derived from animals. It is important to carefully check the ingredients list of Shea Moisture products to determine their vegan status.

Benefits of Shea Butter for Vegans

Shea butter offers a range of benefits for vegans, including its moisturizing and emollient properties, as well as its high content of fatty acids, vitamins, and minerals. Additionally, it is a sustainable and ethical ingredient, making it a popular choice for those who follow a vegan lifestyle.

Alternatives to Shea Butter

While it is a popular ingredient in vegan cosmetics, there are also a range of alternative ingredients that can be used to achieve similar effects. Some common alternatives to shea butter include cocoa butter, mango butter, and avocado butter.

Origins and Production Methods

Shea butter, in its raw form, is inherently plant-based. Extracted from the nuts of the shea tree, the process involves crushing, roasting, grinding, and finally, extracting the oil. The traditional methods predominantly involve manual labor, ensuring its natural essence remains intact.

Ethical Considerations and Animal Welfare

While the primary extraction process is plant-based, concerns may arise regarding the involvement of animals in harvesting or processing. However, the traditional methods of shea butter extraction largely exclude animal exploitation.

Verification Processes for Vegan Certification

To ascertain a product’s vegan status, certifications play a pivotal role. Several organizations provide vegan certifications that scrutinize the entire production chain to ensure no animal-derived ingredients or practices are involved.

Shea Butter Variants and Their Vegan Status

The distinction between unrefined and refined shea butter leads to varied considerations regarding their vegan status.

Unrefined vs. Refined Shea Butter

  • Unrefined Shea Butter: Often considered more natural, this variant undergoes minimal processing, retaining its characteristic nutty aroma and yellow hue. Its vegan status remains intact due to the absence of additional additives.
  • Refined Shea Butter: The refining process involves filtration, deodorization, and bleaching to eliminate impurities and scent. While the core ingredient remains vegan, additives during refining may raise concerns about its vegan status.

Potential Additives and Ingredients

Some shea butter variants might contain additives or preservatives, potentially sourced from animal by-products. These additional components can compromise its vegan label.

AdditivesPotential SourcesVegan Status
Vitamin ESynthetic or derived from soybean oilVaries based on source
FragrancesSynthetic or animal-derivedCheck product labeling
PreservativesSynthetic or derived from various sourcesDepends on specific ingredients

Read Also: How Long Does Grease Makeup Take to Dry.

FAQ

Is raw shea butter vegan?

Yes, raw shea butter is typically vegan as it undergoes minimal processing, ensuring it retains its natural, plant-based essence.

Read Also: Camping Hairstyles for Curly Hair.

Does shea butter contain animal products?

In its pure form, it is derived solely from the nuts of the shea tree, making it inherently vegan. However, additives or refining processes might introduce non-vegan elements.

Read Also: Maybelline Free Sample.

Can vegans use shea butter?

Yes, many vegans opt for certified vegan shea butter that undergoes stringent assessments to confirm its adherence to vegan principles.

Read Also: RealHer Metallic Bronze Eyeliner.

How to identify vegan shea butter?

Look for products carrying recognized vegan certifications or those explicitly labeled as vegan-friendly to ensure they meet ethical standards.

Read Also: Eyebrows Redhead.

Are all shea butter products cruelty-free?

Not necessarily. While shea butter itself may be vegan-friendly, some products might involve animal testing or include non-vegan additives.

Read Also: Candy Made with Stevia.

Conclusion

In the pursuit of ethical skincare choices, determining the vegan status of shea butter is pivotal. While raw shea butter aligns with vegan principles, nuances exist within refined variants and associated additives, urging consumers to scrutinize product labels and certifications. Embracing certified vegan shea butter encapsulates the essence of ethical beauty practices, nourishing skin while honoring ethical values.

Read Also: Shooting Star Makeup.

Continue Reading

Beauty Tips

Eyebrows Redhead: Crafting Your Signature Look

Published

on

eyebrows redhead

Here is your complete guide to eyebrows redhead

Introduction to Eyebrows Redhead

When it comes to embracing the unique beauty of red hair, attention to eyebrows holds significant importance. The distinct hue of red hair often brings about specific challenges and misconceptions regarding eyebrow styling. Understanding how to enhance and complement red hair through proper eyebrow care is crucial for individuals embracing this stunning hair color.

Redheads, often blessed with fair skin and freckles, possess a genetic rarity that deserves specialized attention when it comes to eyebrow maintenance and styling. Let’s delve into the world of eyebrows for redheads, exploring the best practices, tips, and historical perspectives to celebrate this striking combination of red hair and beautifully shaped eyebrows.

Understanding Red Hair and Eyebrows

Red hair owes its unique appearance to a genetic mutation resulting in higher levels of a pigment called pheomelanin. This pigment is responsible for the distinctive reddish hues in hair, affecting not just the scalp but also body hair, including eyebrows. The characteristics of red hair influence the color and appearance of eyebrows, often resulting in lighter shades.

Genetics play a significant role in determining the color of eyebrows for redheads. While some may have naturally matching eyebrow color, others might experience variations, leading to different shades that need attention when considering eyebrow styling.

Eyebrow Styling for Redheads

Matching Eyebrow Shades to Red Hair

One of the fundamental aspects of eyebrow styling for redheads is matching the eyebrow shade to the tone of red hair. Here’s a quick guide:

  • Copper Red Hair: Opt for warmer shades of brown for eyebrows.
  • Auburn Red Hair: Light brown or soft shades of red often complement this hair color best.
  • Bright Red Hair: Consider using soft blondes or light browns to balance the boldness of the hair color.

Techniques for Enhancing Redhead Eyebrows

  • Filling: Use eyebrow pencils or powders to fill in sparse areas, ensuring a natural look.
  • Shaping: Seek professional guidance for shaping eyebrows that complement your facial features and red hair.
  • Tinting: Consider eyebrow tinting to achieve a more harmonious look between hair and eyebrows.

Tools and Products for Maintenance

ProductDescription
Brow PencilPrecise application for filling sparse areas
Brow GelSets eyebrows in place, adds definition
Eyebrow Tint KitFor those opting for tinting services
Spoolie BrushBlends products for a natural finish
Precision TweezersFor at-home maintenance and shaping

Eyebrow Shaping Techniques for Redheads

TechniqueMethodBenefits
WaxingRemoves hair from the eyebrows, providing a clean and defined shapeFast, long-lasting results
ThreadingRemoves hair by inserting a thin thread into the eyebrow hairs, creating a precise and detailed shapeAffordable, suitable for fine hairs
MicrobladingA semi-permanent treatment that involves tattooing individual hair-like strokes to create a natural-looking shapeLasts 1-3 years, low maintenance

Top 10 Eyebrow Styling Tips for Redheads

  1. Know Your Red: Understand the undertones of your red hair to select the most suitable eyebrow shades.
  2. Seek Professional Help: Consult a professional eyebrow stylist for personalized advice.
  3. Natural Look: Embrace a natural-looking eyebrow shape and avoid overly dramatic styles.
  4. Regular Maintenance: Maintain regular appointments for shaping and grooming eyebrows.
  5. Use the Right Products: Invest in quality products suitable for redhead eyebrows.
  6. Brush and Blend: Use a spoolie brush to blend products for a seamless finish.
  7. Avoid Over-Plucking: Maintain the natural shape of your eyebrows and avoid over-plucking.
  8. Consider Tinting: Explore eyebrow tinting for a more harmonious look with your red hair.
  9. Practice Patience: Growing out eyebrows might take time; be patient during the process.
  10. Confidence is Key: Embrace your natural beauty and carry your redhead eyebrows with confidence.

Redhead Eyebrow Trends Through History

Historically, redhead beauty standards have influenced eyebrow trends. From the Renaissance period to the present day, trends in eyebrow styling have evolved, with redheads often setting unique beauty standards. The emphasis on natural beauty in recent years has seen a resurgence in embracing natural eyebrow shapes and colors among redheads.

Eyebrow Maintenance Schedule for Redheads

TaskFrequencyTips
Plucking/ShapingWeeklyUse the right tools, such as tweezers or waxing strips
TrimmingMonthlyKeep an eye on eyebrow growth and adjust as needed
Tinting/DyeingEvery 2-3 monthsChoose a suitable eyebrow dye or tint for your hair color

Enhancing Redhead Eyebrows: Step-by-Step Guide

When it comes to perfecting the art of styling eyebrows for redheads, a step-by-step approach can make all the difference. Let’s delve into a comprehensive guide designed specifically for individuals with red hair, ensuring perfectly groomed and flattering eyebrows that beautifully complement your natural fiery locks.

Step 1: Determine Your Red Hair Shade

Understanding the unique tone of your red hair is crucial in selecting the most suitable eyebrow shades that harmonize with your overall look.

Red Hair ShadeRecommended Eyebrow Shades
Copper RedWarmer shades of brown
Auburn RedLight brown or soft red tones
Bright RedSoft blondes or light browns

Step 2: Gather the Right Tools and Products

Having the appropriate tools and products ensures a seamless eyebrow grooming routine tailored for redheads.

ToolDescription
Brow PencilPrecise application for filling sparse areas
Brow GelSets eyebrows in place, adds definition
Eyebrow Tint KitFor tinting services
Spoolie BrushBlends products for a natural finish
Precision TweezersFor at-home maintenance and shaping

Step 3: Shaping and Filling Techniques

Shaping Your Redhead Eyebrows

  • Seek professional guidance for shaping eyebrows that enhance your facial features and complement your red hair color.

Filling Sparse Areas

  • Use an eyebrow pencil or powder in a shade close to your hair color to fill in any sparse areas for a natural look.

Step 4: Tinting for a Harmonious Look

Consider eyebrow tinting to achieve a more unified and balanced appearance between your red hair and eyebrows.

Step 5: Blending and Final Touches

Use a spoolie brush to blend products for a seamless finish and ensure your eyebrows look natural yet groomed.

This step-by-step guide caters specifically to the needs of redheads, assisting in choosing the right shades, utilizing appropriate tools, and mastering techniques for stunning eyebrow styling. Embrace your natural beauty and let your redhead eyebrows become a symbol of your individuality and charm.

FAQs About Redhead Eyebrows

Can redheads have different eyebrow colors naturally?

Yes, variations in eyebrow color among redheads are natural. While some might have eyebrows that match their hair color, others might have slightly different shades.

What eyebrow products work best for red hair?

Products like eyebrow pencils, gels, and tints in softer shades of brown or blonde are ideal for complementing red hair.

Read Also: How to Cover Tyndall Effect with Makeup.

How can I shape my eyebrows to complement my red hair?

Seek professional guidance to shape eyebrows that complement your facial features and the unique tone of your red hair.

Read Also: How Long Does Grease Makeup Take to Dry.

Is eyebrow tinting a good option for redheads?

Eyebrow tinting can be an excellent option for redheads to achieve a more harmonious look between their hair and eyebrows.

Read Also: Camping Hairstyles for Curly Hair.

Are there specific eyebrow styles that suit redheads better?

Natural-looking eyebrow styles that enhance the natural features without overpowering the face often suit redheads best.

Read Also: Maybelline Free Sample.

Conclusion

As we conclude this exploration into the world of eyebrows for redheads, it becomes evident that the unique combination of red hair and eyebrows deserves thoughtful attention and care. Understanding the nuances of red hair genetics, selecting suitable eyebrow shades, mastering eyebrow styling techniques, and embracing natural beauty trends are pivotal in enhancing the overall appearance of individuals with red hair.

Read Also: Candy Made with Stevia.

Remember, the key lies in celebrating the natural uniqueness of red hair and eyebrows. With the right techniques, products, and confidence, redheads can embrace their striking features and showcase their beauty to the world. Whether it’s matching eyebrow shades, following historical trends, or seeking personalized guidance, the journey to beautifully styled redhead eyebrows is an empowering and rewarding one.

Read Also: RealHer Metallic Bronze Eyeliner.

Continue Reading

Trending