Connect with us

Beauty Tips

Glass Press On Nails: The Ultimate Guide

Published

on

glass press on nails

Here is your complete guide to glass press on nails

Introduction to Glass Press On Nails

Glass press on nails are the latest trend in the world of nail art and beauty. In a fast-paced world where time is precious, achieving stunning, salon-quality nails has never been easier. This comprehensive guide will take you on a journey through the world of glass press on nails, from understanding what they are to applying them like a pro. We’ll also explore the top brands, maintenance tips, design trends, and answer all your burning questions. So, let’s dive into the world of glass press on nails and discover why they’re gaining popularity.

In recent years, press-on nails have gained immense popularity as a convenient and cost-effective alternative to traditional nail extensions. Among these, glass press on nails stand out for their unique and elegant appearance. These nail extensions provide a crystal-clear, transparent finish that resembles the beauty of glass. Now, let’s embark on a journey to understand what glass press on nails are and why they’re the talk of the town.

What Are Glass Press-On Nails?

Glass press-on nails are a groundbreaking innovation in the world of nail art. These nails are crafted from a special glass-like material, known for its transparency and strength. What sets them apart?

  • Transparent Brilliance: They offer a crystal-clear appearance, providing a natural and sophisticated look.
  • Ease of Application: Unlike traditional nail extensions that require salon visits, they can be applied at home without UV lamps or harsh chemicals.
  • Longevity: When applied correctly and cared for, they can last for weeks, making them suitable for special occasions or everyday wear.
  • Cost-Effective: They are often more budget-friendly than frequent salon visits, making them a wallet-friendly choice for maintaining beautiful nails.
How to Apply Glass Press On Nails

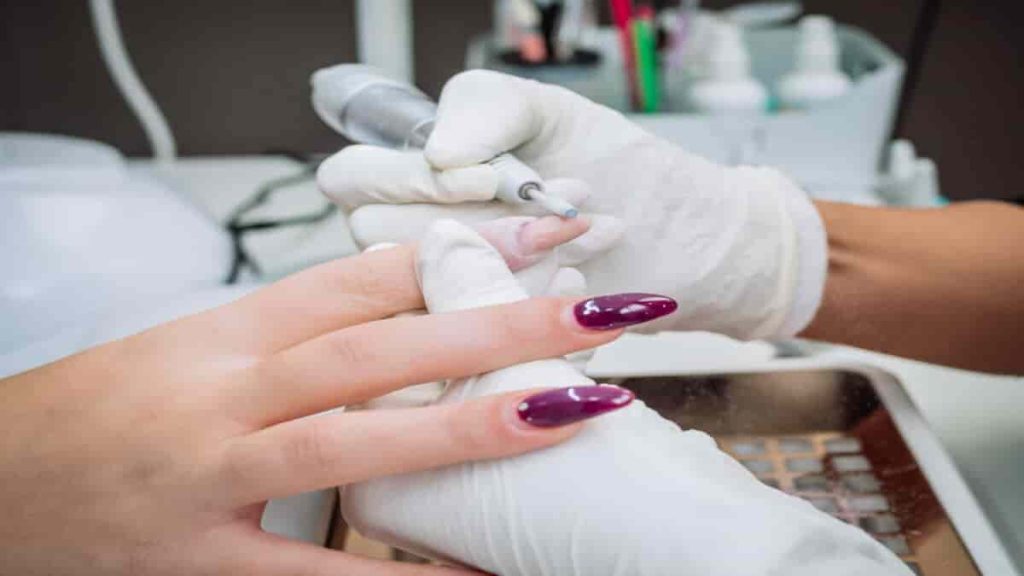
How to Apply Glass Press-On Nails

You’ve decided to try glass press-on nails; now, let’s explore the step-by-step process of applying them like a pro.

Materials You’ll Need

  • A set of glass press-on nails
  • Nail file
  • Nail glue
  • Cuticle pusher
  • Nail buffer
  • Nail clippers (if needed)
  • Alcohol swabs

Step-by-Step Guide

  1. Prepare Your Natural Nails: Start by cleaning your natural nails with an alcohol swab to remove any oils or residues.
  2. Select the Right Size: Choose the glass press-on nails that match the size and shape of your natural nails. Trim and file them if necessary.
  3. Apply Glue: Apply a small amount of nail glue to the back of the press-on nail and a thin layer to your natural nail.
  1. Press-On: Carefully press the glass nail onto your natural nail, ensuring a snug fit. Hold it in place for a few seconds to allow the glue to bond.
  2. Shape and Buff: Use a nail file and buffer to shape and smooth the edges of the glass press-on nail for a seamless finish.
  3. Finish with Top Coat: Apply a top coat to add extra shine and protection to your glass press-on nails.
  4. Final Touch: Use a cuticle pusher to clean up any excess glue or polish around your nails.

Materials You’ll Need

MaterialPurpose
Glass Press-On NailsThe main nail extensions
Nail FileTo shape the press-ons
Nail GlueTo bond press-ons to natural nails
Cuticle PusherFor cuticle care and cleanup
Nail BufferTo smooth the nail surface
Nail Clippers (if needed)To trim press-ons
Alcohol SwabsFor cleaning natural nails

With these steps, you can achieve stunning glass press-on nails in the comfort of your own home. Don’t forget to follow the next section to explore the top 10 glass press-on nail brands!

Glass Press-On Nails vs. Other Nail Extensions

They are a game-changer, but how do they compare to traditional nail extensions like acrylics or gels? Let’s break down the differences and benefits.

Glass Press-On Nails vs. Other Nail Extensions

AspectGlass Press-On NailsAcrylic NailsGel Nails
ApplicationEasy DIY at homeRequires salon visitRequires salon visit
AppearanceCrystal-clear, naturalCan be natural or designedGlossy finish
DurabilityWeeksWeeksWeeks
RemovalEasy removal with acetoneRequires filing or soakingRequires filing or soaking
ToxicityNon-toxicMay contain harmful chemicalsMay contain harmful chemicals
CostAffordableModerateModerate

They offer a unique combination of convenience, transparency, and affordability, making them a standout choice.

Maintenance and Removal

To keep your glass press-on nails looking their best, proper maintenance and safe removal are key. Let’s explore how to care for them.

Maintenance:

  • Avoid excessive exposure to water, which can weaken the glue.
  • Keep your cuticles moisturized with nail oil.
  • Handle your nails gently, especially when dealing with sharp objects.

Maintenance Tips

Maintenance TipPurpose
Avoid Excessive WaterPrevents weakening of the glue
Use Nail OilKeeps cuticles moisturized
Handle with CareAvoids damage from sharp objects

Removal:

  • Soak your nails in warm, soapy water for 10-15 minutes to loosen the glue.
  • Gently pry the press-on nails off using a cuticle pusher.
  • Remove any remaining adhesive with acetone.

Removal Steps

Removal StepPurpose
Soak in Warm WaterLoosens the glue for easy removal
Gently Pry OffRemove press-ons without damage
Remove Adhesive with AcetoneEnsures clean removal of any residue

With these tips, your glass press-on nails will stay fabulous and damage-free.

Pros and Cons of Glass Press-On Nails

Pros

1. Stunning Aesthetic Appeal

They offer a visually striking appearance due to their crystal-clear and transparent nature, providing a natural and elegant look.

2. Easy Application

Applying glass press-on nails is a user-friendly process that can be done at home, making it accessible to individuals without professional training or salon visits.

3. Cost-Effective

Compared to the recurring expenses associated with salon visits for traditional nail extensions, glass press-on nails are budget-friendly and offer a cost-effective alternative.

4. Non-Toxic

Glass press-on nails are typically free from harmful chemicals often found in acrylic and gel nail products, ensuring a safer and healthier nail extension option.

5. Versatile Designs

These nails come in a variety of designs and styles, allowing you to choose from a wide range of options to suit different occasions and preferences.

6. Longevity

With proper application and care, glass press-on nails can last for weeks, providing durability and a long-lasting solution for beautiful nails.

7. Easy Removal

Removing glass press-on nails is a straightforward process that doesn’t require extensive filing or soaking, minimizing the risk of damage to your natural nails.

8. Environmentally Friendly

Some glass press-on nail brands prioritize eco-conscious practices, using sustainable materials and packaging, making them an environmentally responsible choice.

Pros of Glass Press-On Nails

ProsExplanation
Stunning Aesthetic AppealCrystal-clear, natural appearance
Easy ApplicationDIY application at home
Cost-EffectiveBudget-friendly compared to salon visits
Non-ToxicFree from harmful chemicals
Versatile DesignsVarious styles to choose from
LongevityLasts for weeks with proper care
Easy RemovalSimple removal process
Environmentally FriendlySustainable and eco-conscious options available

Cons

1. Limited Durability

Glass press-on nails, while durable, may not be as sturdy as traditional acrylic or gel extensions, making them less suitable for individuals with very active lifestyles.

2. Application Learning Curve

While easier than professional nail extensions, applying glass press-on nails still requires practice to achieve a seamless and natural look.

3. Temporary Solution

They are temporary and require regular maintenance and replacement, which may not appeal to individuals seeking a long-term nail solution.

4. Sizing Challenges

Finding the perfect fit for your natural nails can sometimes be challenging, as press-on nails come in various sizes, and minor adjustments may be necessary.

5. Glue Sensitivity

Individuals with adhesive allergies or sensitivities may experience skin reactions when using nail glue for application.

6. Limited Nail Length Options

Glass press-on nails are generally not suitable for extreme lengths or dramatic nail shapes, limiting options for those looking for a bold, extravagant style.

7. Occasional Air Bubbles

During the application process, small air bubbles may form between the glass press-on nail and your natural nail, affecting the overall aesthetic.

Cons of Glass Press-On Nails

ConsExplanation
Limited DurabilityMay not withstand very active lifestyles
Application Learning CurveRequires practice for professional-looking results
Temporary SolutionRegular maintenance and replacement needed
Sizing ChallengesFinding the perfect fit can be tricky
Glue SensitivityPotential skin reactions for those with allergies
Limited Nail Length OptionsNot suitable for extreme lengths or shapes
Occasional Air BubblesSmall bubbles can affect the final appearance

In conclusion, they offer a range of benefits, including a stunning aesthetic, easy application, and cost-effectiveness. However, they come with limitations, such as durability concerns and the need for regular replacement. Understanding the pros and cons can help you make an informed decision about whether glass press-on nails are the right choice for your nail care routine.

Tips for Long-Lasting Glass Press-On Nails

They can provide stunning, long-lasting nail extensions when cared for properly. Follow these tips to ensure your glass press-on nails maintain their beauty and durability for weeks:

1. Proper Preparation

  • Clean Your Natural Nails: Before application, make sure your natural nails are clean and free of oils. Use an alcohol swab to remove any residues.
  • Nail Shape and Length: Ensure the glass press-on nails you select match the shape and length of your natural nails as closely as possible. Minor adjustments can be made, but a good fit initially is ideal.

2. Quality Nail Glue

  • Choose High-Quality Glue: Invest in a reputable nail glue designed for press-on nails. Quality glue ensures a strong bond, preventing premature lifting.
  • Apply Sparingly: Use a small amount of glue to avoid excess seeping out from the edges. Too much glue can create unsightly lumps and affect adhesion.

3. Secure Application

  • Press Firmly: When applying the glass press-on nails, press them firmly onto your natural nails. Hold each nail in place for a few seconds to allow the glue to bond effectively.
  • Avoid Air Bubbles: Ensure there are no air bubbles trapped under the press-on nails. Any bubbles can compromise the longevity of your nail extensions.

4. Proper Shaping and Filing

  • Shape Carefully: Use a nail file to shape and smooth the edges of the glass press-on nails for a seamless finish. Take your time to achieve the desired shape.
  • Avoid Over-Filing: Be cautious not to over-file the glass press-on nails, as this can weaken them and reduce their durability.

5. Nail Care Routine

  • Gentle Handling: Treat your glass press-on nails with care. Avoid using them as tools for opening packages or performing tasks that could strain them.
  • Moisturize Cuticles: Keep your cuticles moisturized with nail oil or cuticle cream to prevent them from drying out.

6. Top Coat Application

  • Apply a Top Coat: To enhance the shine and protection of your glass press-on nails, apply a clear top coat. This extra layer helps maintain their glossy appearance.

7. Regular Maintenance

  • Check for Lifting: Periodically inspect your glass press-on nails for any signs of lifting or gaps between the natural nail and the extension. If you notice any issues, address them promptly.

8. Avoid Excessive Water

  • Minimize Water Exposure: Prolonged exposure to water, especially hot water, can weaken the bond between the press-on nails and your natural nails. Use gloves for tasks involving water.

9. Safe Removal

  • Gentle Removal: When it’s time to remove your glass press-on nails, be gentle. Soak them in warm, soapy water for 10-15 minutes to loosen the glue, making removal easier.
  • Use Acetone: If needed, use acetone to remove any remaining adhesive. Soak a cotton ball in acetone, place it on the press-on nail, and wrap it with aluminum foil. This softens the glue for easy removal.

By following these tips, you can ensure that your glass press-on nails remain gorgeous and long-lasting. Proper application, care, and maintenance are key to enjoying the beauty and convenience they offer for an extended period.

Glass Press-On Nail Designs and Trends

They have become a canvas for creativity, allowing nail enthusiasts to explore various designs and stay on top of the latest trends. Whether you’re a minimalist looking for a subtle, transparent look or a bold fashionista ready to make a statement, there’s a glass press-on nail design for you. Let’s dive into the exciting world of glass press-on nail designs and the current trends that are taking the beauty industry by storm.

1. Minimalist Elegance

Less is more is a mantra that perfectly fits the minimalist nail trend. These designs feature simple yet elegant patterns, such as:

  • Clear Glass Nails: Embrace the natural transparency of glass press-on nails for a clean, minimalist look.
  • French Tips: Classic French manicures with a twist, where the white tips are replaced with a sheer or transparent finish.
  • Single Accent Nail: Keep most of your nails transparent and add a pop of color or a delicate design to one accent nail.

Minimalist Glass Press-On Nail Designs

DesignDescription
Clear Glass NailsA clean, transparent, and natural appearance
Sheer French TipsA classic French manicure with a transparent twist
Single Accent NailSubtle designs on one nail for a touch of elegance

2. Glitter and Sparkle

If you love a touch of glamour, the glitter and sparkle trend is perfect for you. These designs incorporate shimmering elements to make your nails dazzle:

  • Glitter Gradient: Create a gradient effect by applying glitter from the base of the nail, fading it towards the tips.
  • Holographic Shine: Use holographic nail powders or polishes to achieve a mesmerizing, multi-dimensional look.
  • Gemstone Accents: Add tiny gemstones or rhinestones to your glass press-on nails for a luxurious and eye-catching design.

Glitter and Sparkle Glass Press-On Nail Designs

DesignDescription
Glitter GradientA gradual transition of glitter for a dazzling effect
Holographic ShineMulti-dimensional, iridescent nail art
Gemstone AccentsLuxurious, jewel-like embellishments

3. Artsy Patterns

Express your artistic side with intricate patterns and designs that turn your nails into miniature works of art:

  • Abstract Paintings: Get creative with abstract designs, using a mix of colors, shapes, and textures.
  • Floral Prints: Incorporate delicate flowers, leaves, or botanical elements for a fresh and feminine look.
  • Geometric Patterns: Play with lines, angles, and shapes to create geometric masterpieces on your glass press-on nails.

Artsy Pattern Glass Press-On Nail Designs

DesignDescription
Abstract PaintingsArtistic, free-flowing designs with a unique touch
Floral PrintsBotanical beauty with intricate floral patterns
Geometric PatternsPrecision and symmetry for a modern nail art vibe

4. Ombre and Gradient

Ombre and gradient nail designs continue to be popular due to their seamless blending of colors. Experiment with these styles:

  • Classic Ombre: Blend two complementary colors for a smooth ombre effect.
  • Pastel Dreams: Soft pastel shades in ombre or gradient patterns evoke a sense of tranquility.
  • Rainbow Ombre: Embrace a vibrant, rainbow-inspired ombre look for a fun and playful appearance.

Ombre and Gradient Glass Press-On Nail Designs

DesignDescription
Classic OmbreSubtle transition from one color to another
Pastel DreamsGentle pastel shades for a soothing effect
Rainbow OmbreVibrant, multi-colored ombre for a playful vibe

5. Negative Space

Negative space nail designs leave portions of your glass press-on nails bare, creating intriguing patterns and visual interest:

  • Half-Moon Cutouts: Leave a half-moon shape at the base of your nails uncolored for a stylish look.
  • Dainty Cutouts: Small, intricate cutouts or patterns that reveal the natural nail underneath.
  • Line Art: Use lines, stripes, or geometric shapes to create negative space nail art.

Negative Space Glass Press-On Nail Designs

DesignDescription
Half-Moon CutoutsChic, semi-circular cutouts at the nail base
Dainty CutoutsSmall, delicate patterns revealing natural nail
Line ArtPrecision lines and shapes for a minimalist vibe

6. Matte Finish

Matte nails offer a velvety, non-glossy appearance that adds sophistication to any design:

  • Matte Pastels: Soft pastel shades with a matte finish for a subtle and elegant look.
  • Matte Black: Classic black nails with a matte touch exude edgy sophistication.
  • Matte French Tips: Achieve a twist on the classic French manicure by applying matte topcoat to the tips.

Matte Finish Glass Press-On Nail Designs

DesignDescription
Matte PastelsVelvety, pastel shades for an elegant appearance
Matte BlackEdgy sophistication with a non-glossy black finish
Matte French TipsA matte twist on the classic French manicure

7. 3D Embellishments

For a touch of extravagance, consider 3D embellishments that elevate your glass press-on nail designs:

  • Sculpted Gems: Three-dimensional gemstone-like adornments that catch the light beautifully.
  • Metallic Studs: Tiny metallic studs or beads for a luxurious, textured effect.
  • Miniature Charms: Attach small charms like bows, stars, or hearts to add personality to your nails.

3D Embellishment Glass Press-On Nail Designs

DesignDescription
Sculpted GemsThree-dimensional gemstone-inspired embellishments
Metallic StudsLuxurious metallic studs or beads for texture
Miniature CharmsSmall, charming adornments for personalized nails

8. Transparent French Manicure

Put a modern twist on the classic French manicure by keeping the tips transparent:

  • Clear French Tips: Traditional French manicure with transparent tips for a contemporary look.
  • Colored Tips: Experiment with colored tips while maintaining the transparent base.
  • Glitter Tips: Add a touch of sparkle to your French tips for a glamorous finish.

Transparent French Manicure Glass Press-On Nail Designs

DesignDescription
Clear French TipsClassic French manicure with transparent tips
Colored TipsVibrantly colored French tips for a fun twist
Glitter TipsSparkling, glittery French tips for a touch of glam

9. Custom Creations

Don’t be afraid to get creative and design your unique glass press-on nails:

  • Personalized Art: Express your personality with custom-painted designs or meaningful symbols.
  • Mix and Match: Combine various trends and styles to create a one-of-a-kind, eclectic look.
  • Nail Decals: Use nail decals or stickers to design your custom glass press-on nails effortlessly.

Custom Glass Press-On Nail Designs

DesignDescription
Personalized ArtUnique, custom-painted designs or symbols
Mix and MatchEclectic combinations of various styles and trends
Nail DecalsEffortlessly create custom designs with decals

10. Nature and Seasonal Themes

Draw inspiration from the changing seasons and the beauty of nature:

  • Floral Blooms: Embrace spring with delicate flower motifs or vibrant floral patterns.
  • Winter Wonderland: Create a winter wonderland with snowflakes, icicles, and frosty designs.
  • Tropical Vibes: Welcome summer with palm leaves, seashells, and beach-inspired nail art.

Nature and Seasonal Theme Glass Press-On Nail Designs

DesignDescription
Floral BloomsSpringtime floral patterns for a fresh look
Winter WonderlandFrosty, winter-themed nail art for the cold season
Tropical VibesBeachy, tropical designs to embrace summer vibes

FAQs

Let’s address some common questions about glass press-on nails based on the “People Also Ask” section on Google.

What is the Glass Effect for Nails?

The glass effect for nails refers to the trend of achieving a transparent, crystal-clear appearance on your nails. This effect can be accomplished using specialized materials like glass press-on nails, creating a glossy and elegant look.

Do Press-On Nails Damage Your Natural Nails?

No, properly applied press-on nails, including glass press-on nails, should not damage your natural nails. They are designed to be temporary and can be removed without harming your natural nails. It’s crucial to follow the correct application and removal techniques.

Read Also: Gain Weight on Period.

How Do You Make Your Nails Look Like Glass?

To make your nails look like glass, you can use glass press-on nails or apply a clear nail polish or top coat with a glossy, transparent finish. This will give your nails a stunning glass-like appearance.

Read Also: Can You Swim with Hair Extensions?

What is the Glass Effect for Nails?

The glass effect for nails, often referred to as “glass nails,” is a nail trend that aims to replicate the transparent, crystal-clear appearance of glass on your nails. It involves using specialized materials, like glass press-on nails, to achieve a glossy, see-through finish. This trendy and elegant look can be achieved with glass press-on nails, providing a chic and natural appearance.

Read Also: Blue and Pink Nails Ideas.

Do Press-On Nails Damage Your Natural Nails?

No, properly applied press-on nails, including glass press-on nails, should not damage your natural nails. In fact, they are considered a safer alternative to traditional nail extensions like acrylics or gels. Press-on nails are designed to be temporary and are usually removed without causing harm to your natural nails. However, it’s essential to follow proper application and removal techniques to ensure your nails remain healthy.

Read Also: Icy Pink Nails.

How Do You Make Your Nails Look Like Glass?

To make your nails look like glass, you can use glass press-on nails or follow these steps:

  1. Start with clean, well-manicured nails.
  2. Apply a clear base coat to your natural nails.
  3. Choose a glass-like nail polish or a top coat with a glossy, transparent finish.
  4. Apply one or two coats of the selected polish or top coat, allowing each coat to dry thoroughly.
  5. Finish with a clear top coat for extra shine and protection.

This simple process will give your nails a stunning glass-like appearance, making them appear glossy and elegant.

Read Also: Nail Glue Gel Magic.

How to Do Glass Nails at Home?

Achieving glass nails at home is relatively easy, especially with glass press-on nails. Here’s a step-by-step guide:

  1. Start with clean and dry natural nails.
  2. Select the glass press-on nails that best fit your nail shape and size.
  3. Apply a thin layer of nail glue to your natural nail.
  4. Press the glass nail onto your natural nail, holding it in place for a few seconds to allow the glue to bond.
  5. Use a nail file and buffer to shape and smooth the edges for a seamless finish.
  6. Apply a clear top coat for added shine and protection.

With these steps, you can enjoy the beautiful glass nail effect from the comfort of your home, without the need for salon visits.

Read Also: Abstract Nail Designs 2023.

How to Do Glass Nails at Home?

Achieving glass nails at home is simple, especially with glass press-on nails. Follow the steps mentioned earlier for a professional-looking glass nail finish from the comfort of your home.

Read Also: Lanolin Free Lipstick.

Conclusion

In conclusion, glass press-on nails are a game-changer in the world of nail art and beauty. They offer a convenient, cost-effective, and stylish solution for achieving stunning nails at home. Whether you’re new to nail extensions or a seasoned pro, they provide a unique and elegant option. So, why wait? Embrace the glass press-on nail trend and enjoy the beauty of crystal-clear nails.

Read Also: 3 Nails Plus 1 Cross.

Thank you for embarking on this journey through the world of glass press-on nails with us. We hope this guide has been informative and inspiring. Now, it’s your turn to flaunt those fabulous glass press-on nails!

Read Also: Ultra Violet Lipstick.

Continue Reading
Click to comment

Leave a Reply

Your email address will not be published. Required fields are marked *

Beauty Tips

Tratamiento Labios Secos: Tips para Mantener Labios Suaves

Published

on

tratamiento labios secos

tratamiento labios secos

Introducción a Tratamiento Labios Secos

Los labios secos son un problema común que afecta a muchas personas en todo el mundo. No solo pueden causar incomodidad, sino que también pueden afectar la apariencia estética de nuestra sonrisa. En este artículo, exploraremos en profundidad el tratamiento labios secos, abordando las causas, síntomas, tratamientos efectivos y medidas preventivas. Si alguna vez te has preguntado cómo aliviar la sequedad de tus labios, este artículo es para ti.

La importancia de un tratamiento adecuado para los labios secos no puede subestimarse. No solo se trata de un problema estético; los labios secos pueden ser dolorosos y, en algunos casos, pueden llevar a infecciones. Por eso, es vital entender las razones detrás de esta condición y cómo podemos tratarla de manera efectiva. En este artículo, utilizaremos el término tratamiento labios secos en varias ocasiones para asegurarnos de que encuentres toda la información que necesitas.

Entendiendo los Labios Secos

Causas de los Labios Secos

Los labios secos pueden ser causados por una variedad de factores. Aquí hay algunas de las causas más comunes:

  • Factores Ambientales:
    • El clima frío y seco puede deshidratar la piel de los labios.
    • La exposición al sol sin protección puede causar quemaduras y sequedad.
  • Elecciones de Estilo de Vida:
    • La deshidratación, a menudo resultado de no beber suficiente agua, es una de las principales causas.
    • Fumar puede secar los labios y afectar su salud general.
  • Condiciones Médicas:
    • Enfermedades como la diabetes pueden afectar la hidratación de la piel.
    • Alergias a productos cosméticos o alimentos también pueden causar reacciones que resultan en labios secos.

Fisiología de los Labios

Los labios tienen una estructura única que los hace particularmente susceptibles a la sequedad. A diferencia de otras partes del cuerpo, los labios carecen de glándulas sebáceas, lo que significa que no producen aceites naturales para mantener su hidratación. Además, la piel de los labios es más delgada y sensible, lo que los hace vulnerables a factores externos.

Síntomas de Labios Secos

Identificar los síntomas de los labios secos es el primer paso hacia un tratamiento efectivo. Algunos de los síntomas más comunes incluyen:

  • Grietas y Descamación: Los labios pueden comenzar a agrietarse y pelarse, lo que puede ser doloroso.
  • Dolor y Malestar: La sequedad puede causar incomodidad constante.
  • Cambios en el Color y Textura: Los labios pueden volverse más oscuros o perder su suavidad natural.

Cuándo Buscar Ayuda Médica

Si experimentas síntomas persistentes de labios secos, es importante consultar a un médico. Debes buscar atención profesional si:

  • La sequedad no mejora con tratamientos caseros.
  • Hay signos de infección, como enrojecimiento o hinchazón.
  • Experimentas dolor severo o sangrado.

Tratamientos Efectivos para Labios Secos

Existen múltiples enfoques para el tratamiento labios secos, que van desde remedios caseros hasta opciones profesionales.

Remedios Caseros

Los remedios caseros son una excelente manera de comenzar a tratar los labios secos. Aquí hay algunas estrategias efectivas:

  • Hidratación:
    • Beber suficiente agua es esencial. Se recomienda al menos 8 vasos al día.
  • Exfoliación:
    • Exfoliar suavemente los labios puede ayudar a eliminar las células muertas. Puedes usar un cepillo de dientes suave o una mezcla de azúcar y miel.
  • Aceites y Mantecas Naturales:
    • Aplicar aceites como el aceite de coco o mantecas como la manteca de karité proporciona hidratación profunda.

Productos de Venta Libre

Si los remedios caseros no son suficientes, hay varios productos de venta libre que pueden ayudar:

  • Ingredientes a Buscar:
    • Manteca de Karité: Hidratante natural que ayuda a suavizar los labios.
    • Cera de Abejas: Crea una barrera protectora contra la pérdida de humedad.
    • Lanolina: Un emoliente que ayuda a retener la humedad.
IngredienteBeneficios
Manteca de KaritéHidratación profunda
Cera de AbejasProtección contra la deshidratación
LanolinaRetención de humedad

Los Mejores Productos para el Tratamiento de Labios Secos y Cómo Usarlos

A continuación, se presenta una tabla con algunos de los mejores productos para el tratamiento labios secos, junto con instrucciones sobre cómo utilizarlos para obtener los mejores resultados.

ProductoDescripciónCómo Usarlo
Bálsamo Labial de Manteca de KaritéHidratante natural que proporciona una barrera protectora.Aplica una capa generosa en los labios varias veces al día, especialmente antes de salir.
VaselinaCrea una barrera oclusiva que retiene la humedad.Usa una pequeña cantidad en los labios antes de dormir para una hidratación profunda.
Bálsamo Labial con Ácido HialurónicoAtrae y retiene la humedad, ideal para labios muy secos.Aplica en los labios limpios y secos, repitiendo cada 4 horas o según sea necesario.
Gel de Aloe VeraPropiedades hidratantes y antiinflamatorias.Aplica una pequeña cantidad directamente sobre los labios y deja actuar durante 15 minutos antes de enjuagar.
Exfoliante Labial NaturalElimina las células muertas y suaviza la textura de los labios.Usa una vez a la semana, aplicando suavemente con un cepillo de dientes o una mezcla de azúcar y miel.

Detalles de Uso de Cada Producto

1. Bálsamo Labial de Manteca de Karité

  • Descripción: Este bálsamo es rico en nutrientes y proporciona una hidratación intensa. Ideal para climas fríos y secos.
  • Instrucciones: Aplica generosamente en los labios varias veces al día. Es especialmente efectivo antes de salir al aire libre o antes de dormir.

2. Vaselina

  • Descripción: La vaselina es un producto clásico que actúa como una barrera para evitar la pérdida de humedad.
  • Instrucciones: Usa una pequeña cantidad en los labios antes de acostarte. Esto ayudará a mantener tus labios hidratados durante la noche.

3. Bálsamo Labial con Ácido Hialurónico

  • Descripción: Este bálsamo está formulado para atraer y retener la humedad, lo que lo hace perfecto para labios extremadamente secos.
  • Instrucciones: Aplica sobre los labios limpios y secos. Repite cada 4 horas o según sea necesario, especialmente después de comer o beber.

4. Gel de Aloe Vera

  • Descripción: El gel de aloe vera es conocido por sus propiedades hidratantes y curativas.
  • Instrucciones: Aplica una pequeña cantidad directamente sobre los labios. Deja actuar durante 15 minutos y luego enjuaga con agua tibia para mejores resultados.

5. Exfoliante Labial Natural

  • Descripción: Un exfoliante suave ayuda a eliminar las células muertas y a suavizar la superficie de los labios.
  • Instrucciones: Mezcla azúcar con un poco de miel o aceite de oliva. Aplica suavemente en los labios con movimientos circulares una vez a la semana y enjuaga con agua tibia.

Consejos Adicionales para el Uso de Productos

  • Consistencia: La clave para mantener los labios hidratados es la consistencia. Asegúrate de usar estos productos regularmente.
  • Evita Ingredientes Irritantes: Al elegir productos, evita aquellos que contengan fragancias o mentol, ya que pueden irritar los labios.
  • Almacenamiento: Guarda tus bálsamos labiales en un lugar fresco y seco para mantener su efectividad.

Estos productos y sus usos son esenciales para mantener tus labios hidratados y saludables. Incorporar estos tratamientos en tu rutina diaria puede ayudar a prevenir la sequedad y mantener tus labios en óptimas condiciones.

Los Mejores Consejos para Evitar los Labios Secos

Mantente Hidratado

  • Bebe suficiente agua a lo largo del día para mantener tu cuerpo y piel bien hidratados.
  • Los alimentos ricos en agua, como frutas y verduras, también pueden ayudar con la hidratación.

Usa Bálsamo Labial Regularmente

  • Aplica bálsamo labial varias veces al día, especialmente antes de salir al exterior.
  • Busca productos con ingredientes hidratantes como manteca de karité, aceite de coco, vitamina E y cera de abejas.

Protege tus Labios del Sol

  • Usa un bálsamo labial con protección solar para evitar daños por los rayos UV.
  • La protección solar es importante durante todo el año, no solo en verano.

Exfolia Suavemente

  • Exfoliar los labios una vez a la semana ayuda a eliminar la piel muerta y permite una mejor absorción de los productos.
  • Puedes usar un cepillo de dientes suave o una mezcla de azúcar y miel para exfoliar.

Evita Hábitos Dañinos

  • No te lamas ni muerdas los labios, ya que esto empeora la sequedad.
  • Evita productos labiales con ingredientes irritantes como mentol o fragancias.

Aplica Bálsamo Antes de Dormir

  • Aplicar bálsamo labial antes de acostarte mantiene tus labios hidratados durante la noche.

Siguiendo estos consejos y adoptando una rutina de cuidado labial, podrás evitar y aliviar los molestos labios secos. Recuerda que la hidratación, la protección solar y los hábitos saludables son clave para mantener unos labios suaves y saludables.

Tratamientos Profesionales

En casos más severos, los tratamientos profesionales pueden ser necesarios:

  • Inyecciones de Ácido Hialurónico:
    • Estas inyecciones pueden ayudar a restaurar la hidratación y volumen de los labios.
  • Tratamientos con Láser:
    • Los tratamientos láser pueden mejorar la textura de los labios y aumentar la hidratación.

Medidas Preventivas

La prevención es clave para evitar la sequedad de los labios. Aquí hay algunas recomendaciones:

Rutina Diaria de Cuidado de Labios

  • Uso Regular de Bálsamo Labial:
    • Aplica bálsamo labial varias veces al día, especialmente antes de salir al aire libre.
  • Evitar Hábitos Dañinos:
    • Evita lamerte los labios, ya que esto puede empeorar la sequedad.
    • No muerdas o rasques los labios.

Consejos de Cuidado Estacional

  • Cuidado en Climas Fríos:
    • Usa un bálsamo labial con protección solar en invierno.
  • Protección contra el Sol:
    • Aplica un bálsamo labial con SPF para proteger tus labios de los daños solares.
EstaciónConsejos de Cuidado
InviernoUsa bálsamo labial con SPF
VeranoAplica bálsamo labial con protección solar

Preguntas Frecuentes Sobre Tratamiento Labios Secos

¿Qué causa que los labios se vuelvan secos y agrietados?

Los labios pueden volverse secos debido a factores ambientales, deshidratación, hábitos poco saludables y condiciones médicas subyacentes.

Leer también: Aqua Blue Fragrance.

¿Cómo puedo prevenir los labios secos?

Mantente hidratado, usa bálsamo labial regularmente y evita lamerte los labios.

Leer también: Brochas Para Mascarillas.

¿Hay alimentos que ayudan con la hidratación de los labios?

Sí, consumir alimentos ricos en agua como frutas y verduras puede ayudar a mantener la hidratación general de tu cuerpo, incluyendo tus labios.

Leer también: Pintalabios Camaleón.

¿Es seguro usar vaselina en los labios?

Sí, la vaselina puede ser efectiva para sellar la humedad, pero asegúrate de no usarla en exceso, ya que puede causar dependencia.

Leer también: Perfilador Labios Waterproof.

¿Cuándo debo consultar a un dermatólogo sobre mis labios secos?

Si los síntomas persisten a pesar de los tratamientos caseros o si hay signos de infección, es recomendable consultar a un dermatólogo.

Leer también: Pull Ups While Pregnant.

Conclusión

Los labios secos son un problema común que puede afectar a cualquiera, pero con los tratamientos adecuados y medidas preventivas, puedes mantener tus labios saludables y bien hidratados. Recuerda que la clave está en la hidratación y el cuidado regular. Si tus labios secos persisten, no dudes en buscar ayuda profesional. ¡Adopta una rutina de cuidado de labios y disfruta de una sonrisa hermosa y saludable! Este artículo proporciona una guía completa sobre el tratamiento labios secos, abordando todos los aspectos relevantes para ayudar a los lectores a entender y manejar esta condición de manera efectiva.

Leer también: Brillo de Labios Transparente Permanente.

Continue Reading

Beauty Tips

Keratin Hair Growth Oil Review: Transform Your Hair

Published

on

keratin hair growth oil

Here is your complete guide to keratin hair growth oil.

Introduction to Keratin Hair Growth Oil

Keratin hair growth oil has become a popular topic in the world of hair care, and for good reason. Keratin, a protein found in hair, plays a crucial role in maintaining its health and appearance. When applied topically, keratin hair growth oil can promote hair growth, strengthen hair, moisturize and nourish it, and even improve its shine and texture. In this article, we will delve into the world of keratin hair growth oil, exploring its benefits, ingredients, and application methods.

Understanding Keratin

Keratin is a protein that is naturally present in hair, skin, and nails. It is responsible for giving hair its strength, elasticity, and resilience. Keratin is particularly important for hair health because it helps to maintain the structure and integrity of the hair shaft. There are several types of keratin, each with its own unique properties and functions. For example, keratin 1 and keratin 10 are found in the outermost layer of the hair shaft, while keratin 2 and keratin 3 are found in the inner layers.

Benefits of Keratin Hair Growth Oil

Using keratin hair growth oil can have numerous benefits for your hair. Here are some of the most significant advantages:

  • Promotes Hair Growth: Hair growth oil stimulates hair follicles, promoting healthy hair growth and reducing the likelihood of hair loss.
  • Strengthens Hair: Keratin oil helps to strengthen hair, reducing breakage and improving its elasticity.
  • Moisturizes and Nourishes: Keratin oil is rich in moisturizing ingredients that help to hydrate and nourish the hair, leaving it soft and supple.
  • Improves Shine and Texture: Keratin oil can enhance the overall appearance of hair, leaving it with a healthy shine and smooth texture.

Ingredients in Keratin Hair Growth Oil

Keratin hair growth oil typically contains a blend of natural ingredients that work together to promote hair health. Some common ingredients found in hair growth oil include:

  • Argan Oil: Rich in antioxidants and essential fatty acids, argan oil helps to nourish and moisturize the hair.
  • Jojoba Oil: Similar to sebum, jojoba oil helps to balance the scalp’s natural oils and promote healthy hair growth.
  • Coconut Oil: Coconut oil is rich in lauric acid, which helps to moisturize and nourish the hair.
  • Olive Oil: Olive oil is rich in antioxidants and helps to protect the hair from damage.

Benefits of Key Ingredients in Keratin Hair Growth Oil

IngredientBenefitSource
Argan OilMoisturizes and nourishes hairMorocco
Jojoba OilBalances scalp’s natural oilsNorth America
Coconut OilMoisturizes and nourishes hairSoutheast Asia
Olive OilProtects hair from damageMediterranean

Comparison of Keratin Hair Growth Oils

BrandKey IngredientsPriceCustomer Rating
Keratin ComplexKeratin, Argan Oil, Jojoba Oil$20-$304.5/5
MoroccanoilKeratin, Argan Oil, Coconut Oil$30-$404.8/5
KerastaseKeratin, Olive Oil, Argan Oil$40-$504.7/5

How to Use

Using hair growth oil is relatively simple. Here are some tips to help you get the most out of your hair growth oil:

  • Application Methods: You can apply hair growth oil to your hair in several ways, including massaging it into your scalp, applying it to the ends of your hair, or using it as a leave-in treatment.
  • Frequency of Use: For best results, use hair growth oil 2-3 times a week, depending on your hair type and the specific product you are using.

DIY Keratin Hair Growth Oil Recipes

If you prefer to make your own hair growth oil, here are a few simple recipes to get you started:

  • Recipe 1: Mix 1 tablespoon of argan oil with 1 tablespoon of jojoba oil and 1 tablespoon of coconut oil. Apply to your hair and scalp.
  • Recipe 2: Mix 1 tablespoon of olive oil with 1 tablespoon of argan oil and 1 tablespoon of jojoba oil. Apply to your hair and scalp.
  • Tips for Best Results: When making your own hair growth oil, be sure to store it in a cool, dry place and apply it to your hair within 6 months of making it.

DIY Recipes

RecipeIngredientsApplication
Recipe 1Argan Oil, Jojoba Oil, Coconut OilMassage into scalp and hair
Recipe 2Olive Oil, Argan Oil, Jojoba OilApply to hair and scalp
Recipe 3Coconut Oil, Olive Oil, Argan OilUse as a leave-in treatment

Common Myths

There are several myths surrounding hair growth oil that we should address:

  • Myth 1: Hair growth oil is only for people with damaged hair. 
  • Fact: Hair growth oil can benefit all hair types, from dry and damaged to healthy and strong.
  • Myth 2: Hair growth oil is only effective for a short period. 
  • Fact: When used regularly, hair growth oil can provide long-term benefits for your hair.

How Often Should I Apply Keratin Hair Growth Oil for Best Results?

Recommended Frequency of Application

To maximize the benefits of hair growth oil, it is essential to establish a consistent application routine. Here are the general recommendations for how often to apply hair growth oil:

  • 2-3 Times a Week: For most hair types, applying hair growth oil two to three times a week is ideal. This frequency allows the oil to penetrate the hair shaft and scalp effectively, promoting moisture retention and strengthening the hair without overwhelming it.

Application Techniques

Pre-Wash Treatment

  • 30 Minutes Before Washing: Apply hair growth oil to your hair and scalp 30 minutes before washing. This method helps protect your hair from the drying effects of shampoo and enhances moisture retention.

Post-Wash Treatment

  • After Washing: After washing your hair, apply a small amount of keratin oil to the ends while it is still damp. This technique helps seal in moisture and prevent frizz.

Leave-In Treatment

  • Daily Use: For those with particularly dry or damaged hair, using hair growth oil as a leave-in treatment can be beneficial. Apply a small amount to your hair after styling, focusing on the ends to maintain hydration throughout the day.

Benefits of Regular Application

Applying hair growth oil regularly can lead to several improvements in hair health:

  • Stronger Hair: Regular use strengthens the hair structure, reducing breakage and split ends.
  • Enhanced Moisture: Frequent application helps maintain hydration, making hair softer and more manageable.
  • Reduced Frizz: Consistent use can help control frizz and improve the overall appearance of your hair.
  • Improved Shine: Regular application of keratin oil can enhance the shine and luster of your hair, giving it a healthier look.

Considerations for Different Hair Types

  • Fine Hair: If you have fine hair, consider using hair growth oil once or twice a week to avoid weighing it down.
  • Thick or Curly Hair: For thick or curly hair, you may benefit from applying it three times a week or even daily, especially if your hair is prone to dryness.
  • Color-Treated Hair: If your hair is color-treated, using hair growth oil two to three times a week can help maintain vibrancy and moisture.

Customer Reviews and Testimonials

Many people have reported positive results from using this hair growth oil. Here are a few testimonials to give you an idea of what to expect:

  • “I noticed a significant reduction in hair loss and an improvement in the overall health of my hair after using keratin hair growth oil.”
  • “I was amazed at how soft and manageable my hair became after using hair growth oil. It’s now one of my go-to products.”

Customer Reviews

ReviewHair TypeResults
“I noticed a significant reduction in hair loss and an improvement in the overall health of my hair after using keratin hair growth oil.”Dry and damagedImproved hair health and reduced hair loss
“I was amazed at how soft and manageable my hair became after using keratin hair growth oil. It’s now one of my go-to products.”Healthy and strongSoft and manageable hair

Read Also: Strawberry Milk Perfume.

Frequently Asked Questions about Keratin Hair Growth Oil

What is keratin hair growth oil?

Hair growth oil is a topical treatment that contains keratin, a protein found in hair, skin, and nails.

Read Also: Perfume with Sandalwood and Jasmine.

How often should I use keratin hair growth oil?

For best results, use hair growth oil 2-3 times a week.

Read Also: Hair Protein Cream.

Can keratin oil help with hair loss?

Yes, keratin oil can help to stimulate hair growth and reduce hair loss.

Read Also: Peaches and Cream Nails.

Is keratin hair growth oil suitable for all hair types?

Yes, hair growth oil can benefit all hair types, from dry and damaged to healthy and strong.

Read Also: Lymphatic Drainage Cream.

How long does it take to see results?

Results can vary depending on individual hair types and the specific product used. However, most people start to see improvements within 2-3 weeks of regular use.

Read Also: Supplements for Booty Growth.

Conclusion

Keratin hair growth oil is a powerful tool for promoting healthy, strong hair. By understanding the benefits, ingredients, and application methods of hair growth oil, you can unlock the secrets to achieving the hair of your dreams. Whether you choose to use a commercial product or make your own, hair growth oil is a valuable addition to any hair care routine.

Read Also: Brazilian Keratin Oil.

Continue Reading

Beauty Tips

Brazilian Keratin Oil Hair Transformation

Published

on

brazilian keratin oil

Here is your complete guide to brazilian keratin oil.

Introduction to Brazilian Keratin Oil

If you’re on a quest for silky, smooth, and manageable hair, Brazilian keratin oil might just be the solution you’ve been searching for. This transformative hair treatment has gained immense popularity in recent years, and for good reason. Brazilian keratin oil is a versatile and effective solution that can address a wide range of hair concerns, from taming frizz to repairing damage and enhancing shine.

At its core, Brazilian keratin oil is a potent blend of natural ingredients that work in harmony to nourish and revitalize your locks. Derived from the nutrient-rich Amazon rainforest, this oil is packed with keratin, a protein that is essential for the health and strength of your hair. When applied to the hair, Brazilian keratin oil penetrates deep into the strands, helping to smooth the cuticle, reduce frizz, and impart a stunning, salon-worthy shine.

But their benefits don’t stop there. This versatile hair treatment can also:

  • Strengthen and repair damaged hair
  • Protect against heat styling and environmental stressors
  • Extend the life of color-treated hair
  • Improve manageability and ease of styling
  • Enhance overall hair health and vitality

Whether you have fine, thick, curly, or straight hair, keratin oil can be a game-changer in your hair care routine. In the following sections, we’ll dive deeper into the different types of keratin oil, explore how to use it effectively and uncover the numerous benefits it can offer for your unique hair type and needs.

Types of Brazilian Keratin Oil

When it comes to Brazilian keratin oil, there are several different formulations to choose from, each with its own unique features and benefits. Let’s take a closer look at the most popular options:

  1. Pure Brazilian Keratin Oil: This is the most concentrated form of the oil, offering a potent dose of keratin and other nourishing ingredients to transform your hair.
  2. Brazilian Keratin Oil Shampoo: Infused with the power of keratin oil, these specialized shampoos gently cleanse your hair while delivering the benefits of keratin deep into the strands.
  3. Brazilian Keratin Oil Conditioner: Designed to work in tandem with the keratin oil shampoo, these conditioners help to further smooth, strengthen, and hydrate your hair.
  4. Brazilian Keratin Oil Hair Mask: For an intensive hair treatment, keratin oil hair masks offer a concentrated dose of nourishment to deeply condition and revitalize your locks.

Regardless of which keratin oil product you choose, you can expect to see a noticeable difference in the health and appearance of your hair. Each formulation is carefully crafted to address specific hair concerns and deliver transformative results.

How to Use Brazilian Keratin Oil

Incorporating keratin oil into your hair care routine is a straightforward process, but there are a few key steps to ensure you get the best possible results. Here’s a step-by-step guide to using keratin oil effectively:

Cleanse Your Hair

Start by washing your hair with a keratin oil shampoo, which will gently remove any buildup or impurities while preparing your strands for the treatment.

Apply the Brazilian Keratin Oil

Depending on the length and thickness of your hair, dispense a small amount (usually a few drops) of keratin oil into the palm of your hand. Gently massage the oil into your hair, focusing on the mid-lengths and ends, where it’s needed most.

Distribute Evenly

Use your fingers to evenly distribute the keratin oil throughout your hair, ensuring that every strand is coated and nourished.

Allow Time to Absorb

Let the keratin oil sit on your hair for 5-10 minutes, allowing it to penetrate deep into the strands and work its magic.

Rinse and Style

Rinse the keratin oil out of your hair thoroughly, then style as usual. You may notice an immediate difference in the smoothness and manageability of your hair.

For best results, it’s recommended to use it 1-2 times per week, or as needed to maintain the desired level of frizz control and shine. Remember to adjust the amount of oil you use based on the length and thickness of your hair, and be mindful of any specific instructions or recommendations from the product manufacturer.

Benefits of Brazilian Keratin Oil

The transformative power of Brazilian keratin oil lies in its ability to address a wide range of hair concerns, from taming frizz to repairing damage and enhancing shine. Let’s explore the key benefits of incorporating this versatile hair treatment into your routine:

Smooths and Straightens Hair

The keratin in Brazilian keratin oil helps to smooth the hair cuticle, reducing frizz and flyaways and leaving your locks with a sleek, straight appearance.

Reduces Frizz

It creates a protective barrier around each hair strand, locking in moisture and preventing external factors, such as humidity, from causing frizz and unruly hair.

Adds Shine and Luster

The nourishing ingredients in keratin oil work to improve the overall health and appearance of your hair, imparting a beautiful, glossy shine.

Strengthens and Repairs Damaged Hair

Brazilian keratin oil is rich in proteins and other essential nutrients that help to mend split ends, strengthen weak strands, and revitalize damaged hair.

Protects Against Heat Styling

The protective properties of keratin oil help to shield your hair from the damaging effects of heat styling tools, such as blow dryers, straighteners, and curling irons.

Extends the Life of Hair Color

By sealing the hair cuticle and preventing color from fading, keratin oil can help to prolong the vibrancy and longevity of your hair color.

Suitable for All Hair Types

Whether you have fine, thick, curly, or straight hair, keratin oil can be tailored to your specific needs and hair type, delivering transformative results.

To better understand the impact on different hair types, let’s take a closer look at a comparison table:

Hair TypeEffectiveness of Brazilian Keratin Oil
Fine HairHelps to add weight and body, reducing flyaways and improving manageability.
Thick HairSmooths and tames coarse, unruly strands, leaving hair soft and manageable.
Curly HairHelps to reduce frizz and enhance curl definition, while adding shine and softness.
Straight HairHelps to maintain a sleek, straight appearance and prevent static and flyaways.
Damaged HairRepairs and strengthens strands, improving overall hair health and appearance.
Color-Treated HairHelps to extend the life of hair color by preventing fading and protecting the cuticle.

As you can see, it is a versatile and effective solution for a wide range of hair types and concerns, making it a valuable addition to any hair care routine.

Comparison vs Other Hair Treatments

When it comes to achieving smooth, frizz-free, and healthy-looking hair, keratin oil is not the only option available. Let’s take a closer look at how it stacks up against some other popular hair treatments:

TreatmentEffectivenessCostConvenience
Brazilian Keratin OilHighModerateEasy to use at home
Salon Keratin TreatmentHighHighRequires salon visit
Hair MasksModerateLowEasy to use at home
Hair OilsModerateLowEasy to use at home

As the table shows, keratin oil offers a high level of effectiveness in addressing a range of hair concerns, while being relatively affordable and easy to use at home. In comparison, salon keratin treatments can be more effective but come with a higher price tag and the need to visit a professional salon.

Cost and Brands

BrandPrice
Natural World$4.25 – $7.00
Fantasia IC$59.00
L’ANZA$38.00 – $81.50
FIT COSMETICS$7.00 – $12.00

FAQs About Brazilian Keratin Oil

As you explore the world of Brazilian keratin oil, you may have a few questions about its use and effectiveness. Here are some of the most commonly asked questions, along with their answers:

Is Brazilian Keratin Oil safe for color-treated hair?

Yes, keratin oil is generally safe for use on color-treated hair. In fact, it can help to extend the life of your hair color by protecting the cuticle and preventing fading.

How often should I use Brazilian Keratin Oil?

For best results, it’s recommended to use keratin oil 1-2 times per week, or as needed to maintain the desired level of frizz control and shine. Adjust the frequency based on your hair type and individual needs.

Can Brazilian Keratin Oil be used on wet or dry hair?

Brazilian keratin oil can be used on both wet and dry hair, depending on your preference and the specific product instructions. Some formulations may work better on damp hair, while others are designed for application on dry hair.

Read Also: Strawberry Milk Perfume.

How long does it take to see results from using Brazilian Keratin Oil?

The results from using keratin oil can be quite rapid, with many users reporting a noticeable difference in the smoothness, manageability, and shine of their hair after just one or two uses. However, for more long-lasting and transformative results, it’s recommended to use keratin oil consistently as part of your regular hair care routine.

Read Also: Perfume with Sandalwood and Jasmine.

Can Brazilian Keratin Oil be used on all hair types?

Yes, keratin oil is suitable for use on all hair types, from fine and straight to thick and curly. The versatility of this hair treatment allows it to be tailored to the specific needs and characteristics of your individual hair.

Read Also: Hair Protein Cream.

Conclusion

In the world of hair care, Brazilian keratin oil stands out as a true game-changer. This transformative hair treatment, derived from the nutrient-rich Amazon rainforest, offers a wealth of benefits that can dramatically improve the health, appearance, and manageability of your locks.

Read Also: Peaches and Cream Nails.

Whether you’re struggling with frizz, damage, or a lack of shine, Brazilian keratin oil has the power to address these concerns and leave your hair looking and feeling its absolute best. By smoothing the hair cuticle, reducing flyaways, and infusing your strands with essential proteins and nutrients, this versatile oil can help you achieve the silky, smooth, and manageable hair you’ve always desired.

Read Also: Supplements for Booty Growth.

But the benefits of keratin oil don’t stop there. This remarkable hair treatment can also protect your hair from the damaging effects of heat styling, extend the life of your hair color, and be tailored to suit a wide range of hair types, from fine and straight to thick and curly.

Read Also: Lymphatic Drainage Cream.

Continue Reading

Trending