Connect with us

Beauty Tips

How to Remove Sticker Nails: A Comprehensive Guide

Published

on

how to remove sticker nails

Here is your complete guide to How to Remove Sticker Nails

Introduction to How to Remove Sticker Nails

Sticker nails have become a trendy and convenient way to jazz up your manicure game. However, when it comes time to remove them, many people find themselves facing a sticky situation. The fear of damaging your natural nails or experiencing discomfort during the removal process can be daunting.

In this in-depth guide, we’ll walk you through the how to remove sticker nails process step by step. We’ll also explore why proper removal techniques matter, provide insights from the top 10 Google search results, and offer tips, tricks, and common mistakes to avoid. By the end of this article, you’ll be equipped with the knowledge and confidence to bid farewell to sticker nails without any nail-related regrets.

Why Removing Sticker Nails Correctly Matters

Before we dive into the removal process, let’s understand why it’s crucial to do it right from the start:

  • Nail Health: Your natural nails can suffer if you’re not gentle during the removal process. Proper removal helps maintain their strength and integrity.
  • Comfort: A rushed or painful removal can lead to discomfort, which no one wants to experience.
  • Longevity: If you remove sticker nails correctly, you’ll be ready for your next set without any lingering issues.

Step-by-Step Guide on How to Remove Sticker Nails

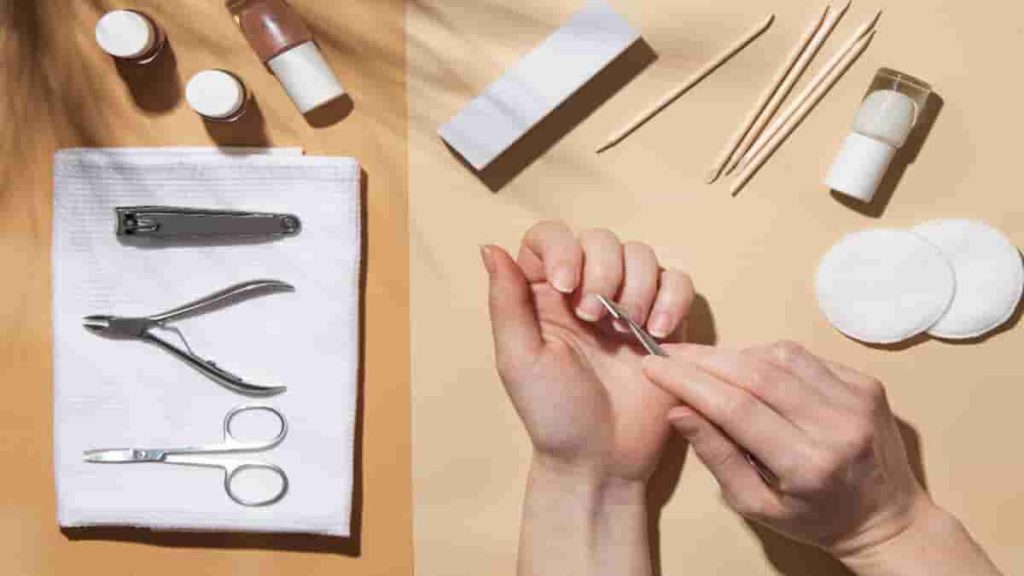
1. Gathering Supplies

Before you begin the removal process, make sure you have the following items at hand:

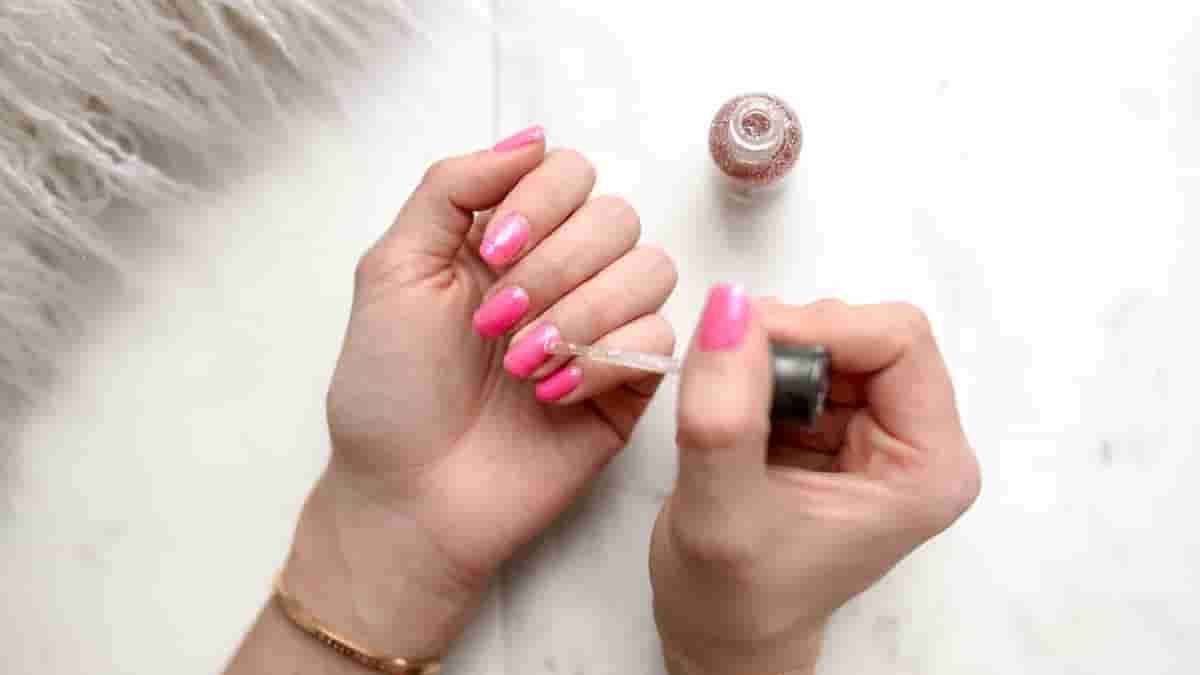
  • Acetone or Nail Polish Remover: This is a crucial component for adhesive removal.
  • Cotton Balls or Pads: These are used to apply the acetone gently.
  • Nail Clippers: In case your nails need a trim.
  • Cuticle Oil: To keep your nails and cuticles moisturized.
  • Warm Water: Needed for the soaking method.
  • Nail Buffer: To smooth out any rough edges.

2. Preparing Your Nails

Proper preparation is key to a successful removal process:

  • Begin with clean and dry nails.
  • Gently trim your nails if needed, but avoid excessive cutting.
  • Be cautious not to damage the surrounding skin.

3. Soaking Method

The soaking method is a popular approach for sticker nail removal:

  • Fill a bowl with warm water.
  • Soak your nails for approximately 10-15 minutes to loosen the adhesive.
  • Be patient; avoid forceful removal during this step.

4. Gentle Peeling Technique

Once the adhesive has softened, follow these steps for gentle peeling:

  • Gently lift the sticker nail’s edge using a wooden cuticle stick.
  • Slowly peel the sticker away from your natural nail.
  • If you encounter resistance, re-soak the nail and try again.

5. Adhesive Residue Removal

After removing the sticker, you may notice some adhesive residue:

  • Dab a cotton ball or pad with acetone.
  • Gently rub the residue until it’s completely gone.
  • Avoid excessive rubbing, as it can damage your nails.

6. Nail Care After Removal

Post-removal care is essential for maintaining healthy nails:

  • Apply cuticle oil to rehydrate your nails and cuticles.
  • Use a nail buffer to smooth any rough spots.
  • Consider giving your nails a break from stickers to allow them to recover.

How to Change Sticker Nails Without Removing Them Completely

Changing sticker nails without removing them completely is a convenient way to refresh your manicure. Here’s a step-by-step guide on how to do it:

Step 1: Gather Your Supplies

Before you begin, make sure you have the following items:

  • New Sticker Nails: Choose the design you want to apply.
  • Nail Glue: You’ll need nail glue to secure the new stickers.
  • Cuticle Stick: To help with precise placement.
  • Nail File and Buffer: For shaping and smoothing.
  • Acetone and Cotton Balls: These will be used to remove any old adhesive if needed.

Step 2: Prepare Your Nails

Ensure your natural nails are clean and free from any old adhesive residue. If there’s any residue left from the previous stickers, gently rub it with a cotton ball soaked in acetone. Wash your hands and dry them thoroughly.

Step 3: Remove the Old Sticker Nails (If Necessary)

If your old sticker nails are still in good condition and you want to change them without removing them, skip this step. However, if they are damaged or need removal, follow the steps for proper removal as mentioned earlier.

Step 4: Shape and Buff Your Natural Nails

Using a nail file, shape your natural nails to your desired length and shape. Be gentle to avoid any damage. After shaping, use a nail buffer to smooth the nail’s surface.

Step 5: Apply the New Sticker Nails

Now, it’s time to apply the new sticker nails:

  1. Apply a small amount of nail glue to the back of the new sticker nail.
  2. Carefully place the sticker nail on your natural nail, starting from the cuticle and pressing down toward the tip.
  3. Use a cuticle stick to smooth out any air bubbles and ensure proper adhesion.
  4. Repeat the process for all your nails, one at a time.

Step 6: Secure and Finish

To ensure your new sticker nails stay in place:

  1. Press down gently on each nail for a few seconds to secure them.
  2. Wait a few minutes for the glue to set completely.

Step 7: Final Touches

After applying the new sticker nails, you can add some final touches:

  • Use a nail buffer to smooth any edges or rough spots.
  • Apply cuticle oil or moisturizer to keep your cuticles and nails hydrated.

Changing sticker nails without removing them entirely is a quick and easy way to update your manicure. With the right technique and a bit of care, you can enjoy a fresh and stylish look without damaging your natural nails.

a step by step guide about how to remove sticker nails

How to Make Sticker Nails Last

Sticker nails can be a fantastic way to achieve trendy and intricate nail designs without the commitment of traditional acrylic or gel nails. However, they do require some care to ensure they last as long as possible. Here are some tips on how to make sticker nails last:

1. Start with Clean Nails

Cleanliness is Key: Before applying sticker nails, ensure your natural nails are clean and free from oils, lotions, or debris. Use a gentle nail polish remover to eliminate any residues.

2. Proper Application

Precise Application: Apply the sticker nails carefully, making sure they adhere smoothly to your natural nails. Avoid air bubbles or creases that can weaken the bond.

3. Avoid Water Exposure

Water and Sticker Nails Don’t Mix: While it’s essential to maintain good hand hygiene, excessive exposure to water can weaken the adhesive. Wear gloves when doing dishes or other tasks that involve prolonged water contact.

4. Be Mindful of Harsh Chemicals

Protect Your Nails: Household cleaning products and harsh chemicals can weaken sticker nails. Use gloves when handling such substances to protect your manicure.

5. Avoid Nail-Biting and Picking

Hands Off: Resist the temptation to bite or pick at your sticker nails. This can damage the edges and cause them to lift prematurely.

6. Gentle Handling

Handle with Care: Be mindful of how you use your nails. Avoid using them to open packages or perform tasks that could put undue stress on them.

7. Regular Maintenance

Touch-Up as Needed: Keep a small supply of spare stickers to replace any that become damaged or start to peel. Promptly addressing issues can extend the life of your manicure.

8. Cuticle Oil

Hydration is Key: Apply cuticle oil regularly to keep your cuticles and nails moisturized. Well-hydrated nails are less likely to chip or break.

9. Avoid Excessive Heat

Extreme Temperatures: Extreme heat, such as hot baths or saunas, can weaken adhesive. Be cautious in these environments.

10. Store Extras Properly

Preserve Spare Stickers: If you have extra sticker nails, store them in a cool, dry place away from direct sunlight. Extreme temperatures can affect the adhesive.

11. Gentle Removal

Remove with Care: When it’s time to change your sticker nails, follow proper removal techniques to minimize damage to your natural nails.

By following these tips, you can maximize the lifespan of your sticker nails and enjoy your stylish manicure for longer periods. Remember that the longevity of sticker nails can vary depending on the brand and quality of the stickers, as well as how well they are applied and maintained.

How to Make Sticker Nails Last: A Guide to Long-Lasting Nail Art

Sticker nails can stay fabulous with proper care.

Cleanliness and Application

Preparation Matters: Start with clean, dry nails for optimal adhesion. Apply stickers precisely, avoiding air bubbles or creases.

Protect Against Water and Chemicals

Shield Your Manicure: Use gloves during water-intensive tasks or when handling harsh chemicals to prevent adhesive weakening.

Gentle Handling and Avoidance of Bad Habits

Handle with Care: Refrain from nail-biting and be cautious with daily activities to prevent damage.

Regular Maintenance and Spare Stickers

Timely Repairs: Keep spare stickers for quick replacements and fix any damage promptly.

Hydration and Temperature Control

Nail Health: Apply cuticle oil for moisture, and avoid extreme heat that can affect adhesive strength.

By following these steps, you can enjoy beautiful sticker nails that last longer, enhancing your style and confidence.

FAQs Section

How can I remove sticker nails without damaging my natural nails?

Follow our step-by-step guide, emphasizing gentle techniques and patience to minimize damage.

Is acetone safe for my nails?

Acetone is safe when used correctly for adhesive removal, but excessive use can lead to dryness. Always moisturize after using acetone.

How long should I soak my nails?

Soaking for 10-15 minutes is usually sufficient, but stubborn stickers may require longer soaking times.

Read Also: Blue and Pink Nails Ideas.

Can I reuse sticker nails?

It’s not recommended, as reusing them can compromise their adhesive quality, and they may not adhere properly.

Read Also: Icy Pink Nails.

How do you remove nail stickers easily?

Removing nail stickers easily requires a gentle approach. Follow these steps:

  1. Soak Your Nails: Fill a bowl with warm water and soak your nails for 10-15 minutes. This softens the adhesive.
  2. Peel Carefully: Gently lift the edge of the nail sticker using a wooden cuticle stick. Slowly peel it away from your natural nail.
  3. Use Acetone: If there’s adhesive residue left, dab a cotton ball with acetone and gently rub it off.
  4. Moisturize: Apply cuticle oil or a moisturizing nail cream to keep your nails and cuticles hydrated.

Read Also: Nail Glue Gel Magic.

How do you remove press-on nail stickers?

Removing press-on nail stickers follows a similar process:

  1. Soak Your Nails: Soak your nails in warm water for 10-15 minutes to loosen the adhesive.
  2. Peel Slowly: Carefully peel off the press-on nail stickers from one side to the other, using a wooden cuticle stick to help if needed.
  3. Adhesive Residue: If there’s any adhesive residue, apply acetone to a cotton ball and gently rub it off.
  4. Nail Care: After removal, moisturize your nails and cuticles to maintain their health.

Read Also: Abstract Nail Designs 2023.

Do nail stickers come off easily?

Nail stickers are designed to adhere well but can be removed with care. They may not come off as easily as they go on, but following the correct removal steps can make the process manageable without damaging your natural nails.

Read Also: Lanolin Free Lipstick.

Do nail stickers damage nails?

When removed correctly, nail stickers should not damage your natural nails. However, if removed forcefully or without following proper techniques, they can potentially damage the nail’s surface or the surrounding skin. It’s crucial to be gentle during the removal process and avoid any aggressive peeling or scraping.

Read Also: 3 Nails Plus 1 Cross.

What should I do if my nails feel sensitive after removal?

Apply cuticle oil and give your nails some time to recover. Avoid further nail treatments until they’ve healed.

Read Also: Ultra Violet Lipstick.

Tips and Tricks for Easier Sticker Nail Removal

  • Use Acetone Sparingly: While acetone is effective, using it excessively can dry out your nails and surrounding skin. Always follow up with moisturizing products.
  • Trim Your Nails Carefully: If you need to trim your natural nails before applying sticker nails, do so gently to avoid damage.
  • Avoid Forceful Peeling: Never forcefully peel off sticker nails, as this can lead to nail damage. Be patient and use the soaking method.
  • Moisturize Regularly: Keep your nails and cuticles hydrated by applying cuticle oil or a moisturizing nail cream regularly.
  • Give Your Nails a Break: After removing sticker nails, consider giving your natural nails a break from adhesives to let them recover fully.

Read Also: Glass Press On Nails.

Common Mistakes to Avoid

  • Forceful Removal: Avoid forcefully ripping off sticker nails, as this can cause significant damage.
  • Skipping Preparation: Neglecting nail preparation can make the removal process more challenging.
  • Overuse of Acetone: Excessive acetone use can lead to nail and skin dryness.
  • Ignoring Adhesive Residue: Leaving adhesive residue on your nails can be uncomfortable and unsightly.
  • Reusing Sticker Nails: Reusing sticker nails is not recommended, as they may not adhere well and can harbor bacteria.

Read Also: How to Get Lipstick Off a Mirror.

DIY vs. Professional Removal

Whether you choose to remove sticker nails yourself or seek professional assistance depends on various factors:

DIY Removal:

  • Pros:
    • Cost-effective
    • Convenience
  • Cons:
    • Requires time and patience
    • Risk of mistakes

Professional Removal:

  • Pros:
    • Expertise
    • Minimal risk of damage
  • Cons:
    • Costlier
    • Appointment scheduling

Read Also: Gain Weight on Period.

Conclusion

Removing sticker nails is a manageable task with the right knowledge and tools. By following our step-by-step guide, avoiding common mistakes, and taking good care of your natural nails, you can enjoy the creative world of sticker nails without any concerns about the removal process.

Remember that patience and gentle techniques are your best friends in this journey. Happy sticker nail removal!

Read Also: Cognac Spice Hair Color.

Continue Reading
Click to comment

Leave a Reply

Your email address will not be published. Required fields are marked *

Beauty Tips

Black Dress with Black Gloves: Mastering the Chic Fusion

Published

on

black dress with black gloves

Here is your complete guide to black dress with black gloves

Introduction to Black Dress with Black Gloves

Black dress with black gloves is a timeless and elegant fashion choice that has been a staple in women’s wardrobes for decades. This classic combination exudes sophistication and style, making it perfect for a variety of occasions. Whether you’re attending a formal event, a cocktail party, or a night out on the town, a black dress with black gloves is sure to turn heads and make a lasting impression. In this article, we will explore the various styles, pairings, and accessories that can be used to enhance this iconic look.

The allure of the black dress with black gloves ensemble is undeniable. It’s not just a style choice; it’s a statement, a testament to refined taste and timeless sophistication. In this article, we delve into the historical significance, styling tips, celebrity influences, and much more surrounding this iconic fashion combination.

History and Evolution

The origins of this ensemble can be traced back through cultural and historical influences. From the elegance of Victorian fashion to iconic Hollywood moments, the black dress and gloves have evolved, maintaining their allure through generations.

Styling Tips for the Perfect Ensemble

  • Choosing the Right Pairing: The key lies in harmonizing the dress and glove styles, lengths, and textures.
  • Accessorizing with Finesse: Complementing this ensemble with shoes, jewelry, and handbags to accentuate the elegance.
  • Versatility for All Seasons: Adapting this ensemble to different seasons and occasions effortlessly.

The Elegance of Black Dresses with Black Gloves

The sleek and sophisticated look of black dresses with black gloves has been a fashion favorite for centuries. This classic combination adds a touch of class to any outfit and is perfect for a variety of occasions. Whether you’re attending a formal event, a cocktail party, or a night out on the town, a black dress with black gloves is sure to turn heads and make a lasting impression.

Different Styles of Black Dresses with Black Gloves

When it comes to black dresses with black gloves, there are a variety of styles to choose from. From mini to maxi, silk to velvet, and fitted to flowy, the options are endless. Here are some of the most popular styles of black dresses with black gloves:

StyleDescription
MiniShort and flirty, perfect for a night out on the town
MaxiLong and elegant, ideal for a formal event or a black-tie affair
SilkLuxurious and sophisticated, perfect for a special occasion
VelvetRich and opulent, great for a winter event or a holiday party
FittedSleek and sexy, perfect for a night out on the town
FlowyRomantic and ethereal, ideal for a summer wedding or a garden party

Pairing Black Dresses with Black Gloves

When it comes to pairing black dresses with black gloves, there are a few things to keep in mind. First, it’s important to choose the right pair of black gloves to complement your dress. Whether you opt for long opera gloves or short wrist-length gloves, the key is to find a pair that fits well and complements your dress. Additionally, it’s important to consider the impact of different glove styles on the overall look. For example, long opera gloves can add a touch of drama to a simple black dress, while short wrist-length gloves can create a more casual and relaxed look.

Accessorizing Black Dresses with Black Gloves

In addition to the gloves, there are a variety of accessories that can be used to enhance a black dress with black gloves. From statement handbags to layered jewelry, the options are endless. Here are some of the most popular accessories for black dresses with black gloves:

AccessoryDescription
Statement HandbagA bold and eye-catching handbag can add a pop of color to a black dress
Layered JewelryFrom necklaces to bracelets, layered jewelry can add a touch of glamour
Statement BeltA wide patent belt can add some sex appeal to a plain black dress
ScarfA silk scarf can add a touch of elegance to a black dress with black gloves
HatA chic hat can add a touch of old Hollywood glamour to a black dress

Black Dresses with Black Gloves for Different Occasions

Black dresses with black gloves are perfect for a variety of occasions. From formal events to casual outings, the classic combination is sure to turn heads and make a lasting impression. Here are some of the most popular occasions for black dresses with black gloves:

OccasionDescription
Formal EventA black-tie affair or a gala event is the perfect occasion for a black dress
Cocktail PartyA night out on the town or a cocktail party is the perfect occasion for a black dress with black gloves
Casual OutingBrunch with friends or a day at the museum is the perfect occasion for a black dress with black gloves
Special OccasionA wedding or a holiday party is the perfect occasion for a black dress with black gloves

Celebrities and Red Carpet Glamour

The red carpet has been a stage for this ensemble’s elegance, embraced by icons and celebrities who redefine fashion trends and set the tone for elegance in the spotlight.

Impact on Runways and Fashion Shows

From high fashion runways to designer showcases, this ensemble has left an indelible mark on the world of couture, inspiring collections and influencing the runway narratives.

Exploring Fabric and Texture Choices

  • Varied Fabrics: From silk’s luxurious sheen to velvet’s rich texture, choices that define elegance.
  • Textures and Patterns: Enhancing the ensemble with intricate details and patterns.

Expressing Personal Style

Customizations and personal touches infuse individualistic interpretations, allowing individuals to embrace this ensemble in a way that reflects their unique style.

Fashion Icons and Inspirations

Icons throughout history have effortlessly carried the elegance of the black dress and gloves, inspiring generations and leaving an indelible mark on fashion’s evolution.

Dress and Glove Pairing Guide

A comprehensive guide showcasing various dress and glove pairings for different occasions.

Dress StyleGlove LengthTexture
Little Black DressElbow LengthSatin
GownOpera LengthLace
A-line DressWrist LengthLeather

Seasonal Adaptations and Accessories

Highlighting accessory choices and adaptations for different seasons.

SeasonAccessories
SummerStrappy Heels, Clutch
WinterFur Stole, Boots
FallScarves, Tights

Celebrity Influences

Notable celebrities and their iconic moments in the black dress and gloves ensemble.

CelebrityIconic Moment
Audrey HepburnBreakfast at Tiffany’s
RihannaMet Gala Appearance
Grace KellyRed Carpet Perfection

Fashion Icon Inspirations

Influential fashion icons and their lasting impact on this ensemble.

IconContribution to Fashion
Coco ChanelIntroduction of the LBD
Jackie KennedyElegance in Political Scene
Marilyn MonroeSensual Elegance

Fabric and Texture Varieties

Different fabric and texture choices to enhance the elegance of the ensemble.

FabricTexture
SilkSmooth and Lustrous
VelvetRich and Luxurious
LaceDelicate and Intricate

FAQs: Insights from ‘People Also Ask’ Section

How to Choose the Right Length and Style of Gloves?

Select glove length based on the dress style and occasion. Opera-length for formal gowns and wrist-length for casual dresses.

Read Also: RealHer Metallic Bronze Eyeliner.

Can Black Gloves Be Paired with Any Black Dress?

Absolutely! The key is to match textures and styles for a cohesive look.

Read Also: Eyebrows Redhead.

What Shoes Complement a Black Dress with Black Gloves?

For a formal look, opt for elegant heels, while boots or flats can add a modern twist.

Read Also: Shooting Star Makeup.

Are There Cultural Considerations in Wearing this Ensemble?

While the ensemble carries universal elegance, cultural norms may influence accessories or glove styles.

Read Also: Is Shea Butter Vegan.

Tips for Maintaining the Elegance Throughout the Day/Night?

Choose comfortable glove fabrics, and consider the occasion when deciding on dress length to ensure ease of movement.

Read Also: Candy Made with Stevia.

Conclusion

In conclusion, black dresses with black gloves are a timeless and elegant fashion choice that is perfect for a variety of occasions. Whether you’re attending a formal event, a cocktail party, or a night out on the town, a black dress with black gloves is sure to turn heads and make a lasting impression. With the right pair of gloves and the perfect accessories, you can create a look that is both sophisticated and stylish. So why not embrace this classic combination and rock a black dress with black gloves at your next event?

Read Also: All Natural Room Spray.

Continue Reading

Beauty Tips

Is Shea Butter Vegan? A Comprehensive Guide

Published

on

is shea butter vegan

Here is your complete guide to is shea butter vegan

Introduction to Is Shea Butter Vegan

Shea butter is a hugely popular ingredient in the cosmetics industry. As it is plant-based, it’s also a staple in vegan cosmetics. In this article, we will explore the question, “Is shea butter vegan?” We will delve into the origins of shea butter, its use in cosmetics, and the controversy surrounding its vegan status. We will also discuss the relationship between shea butter and the brand Shea Moisture, and provide a detailed overview of the brand’s offerings. Additionally, we will address common FAQs and provide a list of LSI/NLP keywords related to the topic.

Shea butter is a type of plant-based fat that is extracted from the nuts of the Shea Tree, which is native to West Africa. At room temperature, this fat is solid and is full of fatty acids, vitamins, and minerals. Because of its texture and nutritional profile, shea butter is a popular ingredient for use in medicinal and cosmetic applications, especially lotions and ointments. But is shea butter vegan? In this article, we will explore the vegan status of shea butter and its use in the cosmetics industry.

What is Shea Butter?

Shea butter is a fatty substance extracted from the nuts of the African shea tree, Vitellaria paradoxa, that has several useful properties in skincare and similar applications. It is a popular ingredient in lotions, moisturizers, and other cosmetics due to its emollient properties and ability to help with redness and itching. Shea butter is also known for its high content of fatty acids, vitamins, and minerals, making it a valuable ingredient in skincare products.

Is Shea Butter Vegan?

Yes, it is 100% vegan-friendly. It is simply a fatty substance extracted from the nuts of the African shea tree, and it does not contain any animal-derived ingredients. Therefore, it is suitable for use in vegan cosmetics and skincare products.

Shea Moisture and Veganism

Shea Moisture is a popular brand that offers a range of natural and organic beauty products. While some of their products are vegan-friendly, the brand cannot claim to be entirely vegan, as some of their products contain ingredients derived from animals. It is important to carefully check the ingredients list of Shea Moisture products to determine their vegan status.

Benefits of Shea Butter for Vegans

Shea butter offers a range of benefits for vegans, including its moisturizing and emollient properties, as well as its high content of fatty acids, vitamins, and minerals. Additionally, it is a sustainable and ethical ingredient, making it a popular choice for those who follow a vegan lifestyle.

Alternatives to Shea Butter

While it is a popular ingredient in vegan cosmetics, there are also a range of alternative ingredients that can be used to achieve similar effects. Some common alternatives to shea butter include cocoa butter, mango butter, and avocado butter.

Origins and Production Methods

Shea butter, in its raw form, is inherently plant-based. Extracted from the nuts of the shea tree, the process involves crushing, roasting, grinding, and finally, extracting the oil. The traditional methods predominantly involve manual labor, ensuring its natural essence remains intact.

Ethical Considerations and Animal Welfare

While the primary extraction process is plant-based, concerns may arise regarding the involvement of animals in harvesting or processing. However, the traditional methods of shea butter extraction largely exclude animal exploitation.

Verification Processes for Vegan Certification

To ascertain a product’s vegan status, certifications play a pivotal role. Several organizations provide vegan certifications that scrutinize the entire production chain to ensure no animal-derived ingredients or practices are involved.

Shea Butter Variants and Their Vegan Status

The distinction between unrefined and refined shea butter leads to varied considerations regarding their vegan status.

Unrefined vs. Refined Shea Butter

  • Unrefined Shea Butter: Often considered more natural, this variant undergoes minimal processing, retaining its characteristic nutty aroma and yellow hue. Its vegan status remains intact due to the absence of additional additives.
  • Refined Shea Butter: The refining process involves filtration, deodorization, and bleaching to eliminate impurities and scent. While the core ingredient remains vegan, additives during refining may raise concerns about its vegan status.

Potential Additives and Ingredients

Some shea butter variants might contain additives or preservatives, potentially sourced from animal by-products. These additional components can compromise its vegan label.

AdditivesPotential SourcesVegan Status
Vitamin ESynthetic or derived from soybean oilVaries based on source
FragrancesSynthetic or animal-derivedCheck product labeling
PreservativesSynthetic or derived from various sourcesDepends on specific ingredients

Read Also: How Long Does Grease Makeup Take to Dry.

FAQ

Is raw shea butter vegan?

Yes, raw shea butter is typically vegan as it undergoes minimal processing, ensuring it retains its natural, plant-based essence.

Read Also: Camping Hairstyles for Curly Hair.

Does shea butter contain animal products?

In its pure form, it is derived solely from the nuts of the shea tree, making it inherently vegan. However, additives or refining processes might introduce non-vegan elements.

Read Also: Maybelline Free Sample.

Can vegans use shea butter?

Yes, many vegans opt for certified vegan shea butter that undergoes stringent assessments to confirm its adherence to vegan principles.

Read Also: RealHer Metallic Bronze Eyeliner.

How to identify vegan shea butter?

Look for products carrying recognized vegan certifications or those explicitly labeled as vegan-friendly to ensure they meet ethical standards.

Read Also: Eyebrows Redhead.

Are all shea butter products cruelty-free?

Not necessarily. While shea butter itself may be vegan-friendly, some products might involve animal testing or include non-vegan additives.

Read Also: Candy Made with Stevia.

Conclusion

In the pursuit of ethical skincare choices, determining the vegan status of shea butter is pivotal. While raw shea butter aligns with vegan principles, nuances exist within refined variants and associated additives, urging consumers to scrutinize product labels and certifications. Embracing certified vegan shea butter encapsulates the essence of ethical beauty practices, nourishing skin while honoring ethical values.

Read Also: Shooting Star Makeup.

Continue Reading

Beauty Tips

Eyebrows Redhead: Crafting Your Signature Look

Published

on

eyebrows redhead

Here is your complete guide to eyebrows redhead

Introduction to Eyebrows Redhead

When it comes to embracing the unique beauty of red hair, attention to eyebrows holds significant importance. The distinct hue of red hair often brings about specific challenges and misconceptions regarding eyebrow styling. Understanding how to enhance and complement red hair through proper eyebrow care is crucial for individuals embracing this stunning hair color.

Redheads, often blessed with fair skin and freckles, possess a genetic rarity that deserves specialized attention when it comes to eyebrow maintenance and styling. Let’s delve into the world of eyebrows for redheads, exploring the best practices, tips, and historical perspectives to celebrate this striking combination of red hair and beautifully shaped eyebrows.

Understanding Red Hair and Eyebrows

Red hair owes its unique appearance to a genetic mutation resulting in higher levels of a pigment called pheomelanin. This pigment is responsible for the distinctive reddish hues in hair, affecting not just the scalp but also body hair, including eyebrows. The characteristics of red hair influence the color and appearance of eyebrows, often resulting in lighter shades.

Genetics play a significant role in determining the color of eyebrows for redheads. While some may have naturally matching eyebrow color, others might experience variations, leading to different shades that need attention when considering eyebrow styling.

Eyebrow Styling for Redheads

Matching Eyebrow Shades to Red Hair

One of the fundamental aspects of eyebrow styling for redheads is matching the eyebrow shade to the tone of red hair. Here’s a quick guide:

  • Copper Red Hair: Opt for warmer shades of brown for eyebrows.
  • Auburn Red Hair: Light brown or soft shades of red often complement this hair color best.
  • Bright Red Hair: Consider using soft blondes or light browns to balance the boldness of the hair color.

Techniques for Enhancing Redhead Eyebrows

  • Filling: Use eyebrow pencils or powders to fill in sparse areas, ensuring a natural look.
  • Shaping: Seek professional guidance for shaping eyebrows that complement your facial features and red hair.
  • Tinting: Consider eyebrow tinting to achieve a more harmonious look between hair and eyebrows.

Tools and Products for Maintenance

ProductDescription
Brow PencilPrecise application for filling sparse areas
Brow GelSets eyebrows in place, adds definition
Eyebrow Tint KitFor those opting for tinting services
Spoolie BrushBlends products for a natural finish
Precision TweezersFor at-home maintenance and shaping

Eyebrow Shaping Techniques for Redheads

TechniqueMethodBenefits
WaxingRemoves hair from the eyebrows, providing a clean and defined shapeFast, long-lasting results
ThreadingRemoves hair by inserting a thin thread into the eyebrow hairs, creating a precise and detailed shapeAffordable, suitable for fine hairs
MicrobladingA semi-permanent treatment that involves tattooing individual hair-like strokes to create a natural-looking shapeLasts 1-3 years, low maintenance

Top 10 Eyebrow Styling Tips for Redheads

  1. Know Your Red: Understand the undertones of your red hair to select the most suitable eyebrow shades.
  2. Seek Professional Help: Consult a professional eyebrow stylist for personalized advice.
  3. Natural Look: Embrace a natural-looking eyebrow shape and avoid overly dramatic styles.
  4. Regular Maintenance: Maintain regular appointments for shaping and grooming eyebrows.
  5. Use the Right Products: Invest in quality products suitable for redhead eyebrows.
  6. Brush and Blend: Use a spoolie brush to blend products for a seamless finish.
  7. Avoid Over-Plucking: Maintain the natural shape of your eyebrows and avoid over-plucking.
  8. Consider Tinting: Explore eyebrow tinting for a more harmonious look with your red hair.
  9. Practice Patience: Growing out eyebrows might take time; be patient during the process.
  10. Confidence is Key: Embrace your natural beauty and carry your redhead eyebrows with confidence.

Redhead Eyebrow Trends Through History

Historically, redhead beauty standards have influenced eyebrow trends. From the Renaissance period to the present day, trends in eyebrow styling have evolved, with redheads often setting unique beauty standards. The emphasis on natural beauty in recent years has seen a resurgence in embracing natural eyebrow shapes and colors among redheads.

Eyebrow Maintenance Schedule for Redheads

TaskFrequencyTips
Plucking/ShapingWeeklyUse the right tools, such as tweezers or waxing strips
TrimmingMonthlyKeep an eye on eyebrow growth and adjust as needed
Tinting/DyeingEvery 2-3 monthsChoose a suitable eyebrow dye or tint for your hair color

Enhancing Redhead Eyebrows: Step-by-Step Guide

When it comes to perfecting the art of styling eyebrows for redheads, a step-by-step approach can make all the difference. Let’s delve into a comprehensive guide designed specifically for individuals with red hair, ensuring perfectly groomed and flattering eyebrows that beautifully complement your natural fiery locks.

Step 1: Determine Your Red Hair Shade

Understanding the unique tone of your red hair is crucial in selecting the most suitable eyebrow shades that harmonize with your overall look.

Red Hair ShadeRecommended Eyebrow Shades
Copper RedWarmer shades of brown
Auburn RedLight brown or soft red tones
Bright RedSoft blondes or light browns

Step 2: Gather the Right Tools and Products

Having the appropriate tools and products ensures a seamless eyebrow grooming routine tailored for redheads.

ToolDescription
Brow PencilPrecise application for filling sparse areas
Brow GelSets eyebrows in place, adds definition
Eyebrow Tint KitFor tinting services
Spoolie BrushBlends products for a natural finish
Precision TweezersFor at-home maintenance and shaping

Step 3: Shaping and Filling Techniques

Shaping Your Redhead Eyebrows

  • Seek professional guidance for shaping eyebrows that enhance your facial features and complement your red hair color.

Filling Sparse Areas

  • Use an eyebrow pencil or powder in a shade close to your hair color to fill in any sparse areas for a natural look.

Step 4: Tinting for a Harmonious Look

Consider eyebrow tinting to achieve a more unified and balanced appearance between your red hair and eyebrows.

Step 5: Blending and Final Touches

Use a spoolie brush to blend products for a seamless finish and ensure your eyebrows look natural yet groomed.

This step-by-step guide caters specifically to the needs of redheads, assisting in choosing the right shades, utilizing appropriate tools, and mastering techniques for stunning eyebrow styling. Embrace your natural beauty and let your redhead eyebrows become a symbol of your individuality and charm.

FAQs About Redhead Eyebrows

Can redheads have different eyebrow colors naturally?

Yes, variations in eyebrow color among redheads are natural. While some might have eyebrows that match their hair color, others might have slightly different shades.

What eyebrow products work best for red hair?

Products like eyebrow pencils, gels, and tints in softer shades of brown or blonde are ideal for complementing red hair.

Read Also: How to Cover Tyndall Effect with Makeup.

How can I shape my eyebrows to complement my red hair?

Seek professional guidance to shape eyebrows that complement your facial features and the unique tone of your red hair.

Read Also: How Long Does Grease Makeup Take to Dry.

Is eyebrow tinting a good option for redheads?

Eyebrow tinting can be an excellent option for redheads to achieve a more harmonious look between their hair and eyebrows.

Read Also: Camping Hairstyles for Curly Hair.

Are there specific eyebrow styles that suit redheads better?

Natural-looking eyebrow styles that enhance the natural features without overpowering the face often suit redheads best.

Read Also: Maybelline Free Sample.

Conclusion

As we conclude this exploration into the world of eyebrows for redheads, it becomes evident that the unique combination of red hair and eyebrows deserves thoughtful attention and care. Understanding the nuances of red hair genetics, selecting suitable eyebrow shades, mastering eyebrow styling techniques, and embracing natural beauty trends are pivotal in enhancing the overall appearance of individuals with red hair.

Read Also: Candy Made with Stevia.

Remember, the key lies in celebrating the natural uniqueness of red hair and eyebrows. With the right techniques, products, and confidence, redheads can embrace their striking features and showcase their beauty to the world. Whether it’s matching eyebrow shades, following historical trends, or seeking personalized guidance, the journey to beautifully styled redhead eyebrows is an empowering and rewarding one.

Read Also: RealHer Metallic Bronze Eyeliner.

Continue Reading

Trending